ROTARY RN1S KOFFIE CAPSULE VULLEN SLUITMACHINE
Bedienings- en onderhoudshandleiding
*Deze handleiding kan worden gebruikt voor alle RN1S koffiecapsules, vul- en sluitmachines, ongeacht of u Nespresso, K-cups, Lavazza, Dolce Gusto, enz. produceert, ze kunnen allemaal deze machine volgen. Bedankt
INHOUDSOPGAVE
(Vanaf deze pagina ziet u de volgende inhoud en kunt u op de inhoud klikken die u nodig hebt om naar de gedetailleerde beschrijving te gaan)
1.3 Koffiecapsule Het vullen van de sluitmachine is gevaarlijk. 5
2.1 Belangrijkste kenmerken. 6
2.5 Bediening Computerschermindelingen en toetsfuncties. 8
3 Installatie en voorbereiding voor de operatie. 9
3.1 Voeding – 240 Volt 50 Hz. 9
3.3 Perslucht – Blauwe regelaar 9
3.4 Stikstof – Rode regelaar 9
3.7 Programmeren van de dosering. 11
3.8 Instellen van de kopjescapsuleteller 11
3.9 Tellen van het aantal capsules aan het einde van de transportband 11
4 Het plaatsen van de gemalen koffie. 13
4.1 Over de lader voor gemalen koffie. 13
4.2 Het laden en lossen van de gemalen koffie. 13
4.3 Het reservoir voor gemalen koffie leegmaken 13
5 BEDIENING van de sluitmachine voor het vullen van koffiecapsules.. 15
5.2 Bediening van de machine in automatische modus. 15
5.3 Functies handmatig bedienen. 16
6.2 Automatisch lopende pagina. 17
10 Veelvoorkomende problemen en probleemoplossing. 27
APPENDIX B: Electrical Diagrams... 29
11 Machinetechnische parameters. 29
1 Inleiding
1.1 Doel
Lees deze handleiding zorgvuldig door voordat u de machine installeert, om persoonlijk letsel en/of schade aan de machine te voorkomen.
Maak uzelf vertrouwd met de machine, de aansluitingen en de noodstopprocedure voordat u probeert deze te bedienen.
1.2 Publiek
Deze handleiding is bedoeld als hulpmiddel bij het trainen van de basisbediening en het programmeren van de machine. Machinebediening mag alleen worden uitgevoerd door opgeleid personeel onder technisch toezicht.
1.3 Verpakkingsmachines zijn gevaarlijk.
Verpakkingsactiviteiten vereisen bewegende armen en hefboompunten, hoogspanning en hogedrukgassen, die allemaal ernstige schade kunnen veroorzaken.
- Het is essentieel dat al het personeel dat de machine bedient, correct is opgeleid en de veiligheidsregels in deze handleiding naleeft.
- Verwijder geen veiligheidsvoorzieningen en schakel het deuralarm niet uit, aangezien dit gevaarlijk kan zijn en mogelijk ernstig letsel aan de operator kan veroorzaken.
- De operators moeten fysiek en intellectueel geschikt zijn om hun werk uit te voeren. Zij zijn de enige personen die de machine mogen benaderen en zij zijn verplicht alleen de vooraf vastgestelde taken uit te voeren, waarvoor zij naar behoren zijn opgeleid.
- Alleen bevoegd technisch personeel mag onderhoud aan de machine uitvoeren.
- Onbevoegd personeel mag de machine niet betreden terwijl deze in werking is.
- Laat de machine nooit onbeheerd achter terwijl deze in werking is.
- Alleen gekwalificeerd personeel mag de MACHINE BEDIENEN, ONDERHOUDEN en REPAREREN
- STOP met het gebruik van de machine als er een storing optreedt en laat de machine onmiddellijk repareren.
- De deur van het elektrisch bord moet altijd gesloten zijn.
- Let tijdens het werken met de machine op ongewone geluiden. Als u iets ongewoons hoort, stop dan de machine en onderzoek onmiddellijk.
1.4 Veiligheidsdeur
Om veiligheidsredenen mag de deur niet worden geopend als de machine draait. Er zijn naderingsschakelaars bij de toegangsdeuren tot de machine. Wanneer de deur open is, stopt deze automatisch de machine, klinkt er een alarm en begint het flitslicht te knipperen.
LET OP VEILIGHEIDSGEVAAR: Voor ervaren operators en onderhoudspersoneel kan het nodig zijn de deur te openen en de machine te laten draaien. In dit geval kunt u de veiligheidsdeurfunctie uitschakelen via het aanraakscherm.
1.5 Noodstop
In an emergency, you can press the red "stop" button on the machine, the machine will stop running immediately. After troubleshooting, then you can reset the button. Turn it right to reset.[/vc_column_text][/vc_column][/vc_row][vc_row][vc_column][vc_column_text]
2 Systeembeschrijving
2.1 Belangrijkste kenmerken
De ROTARY RN1S KOFFIECAPSULE VUL- EN SLUITMACHINE is een volledig gesloten geautomatiseerde capsulevulmachine die tot 70 capsules per minuut kan verwerken.
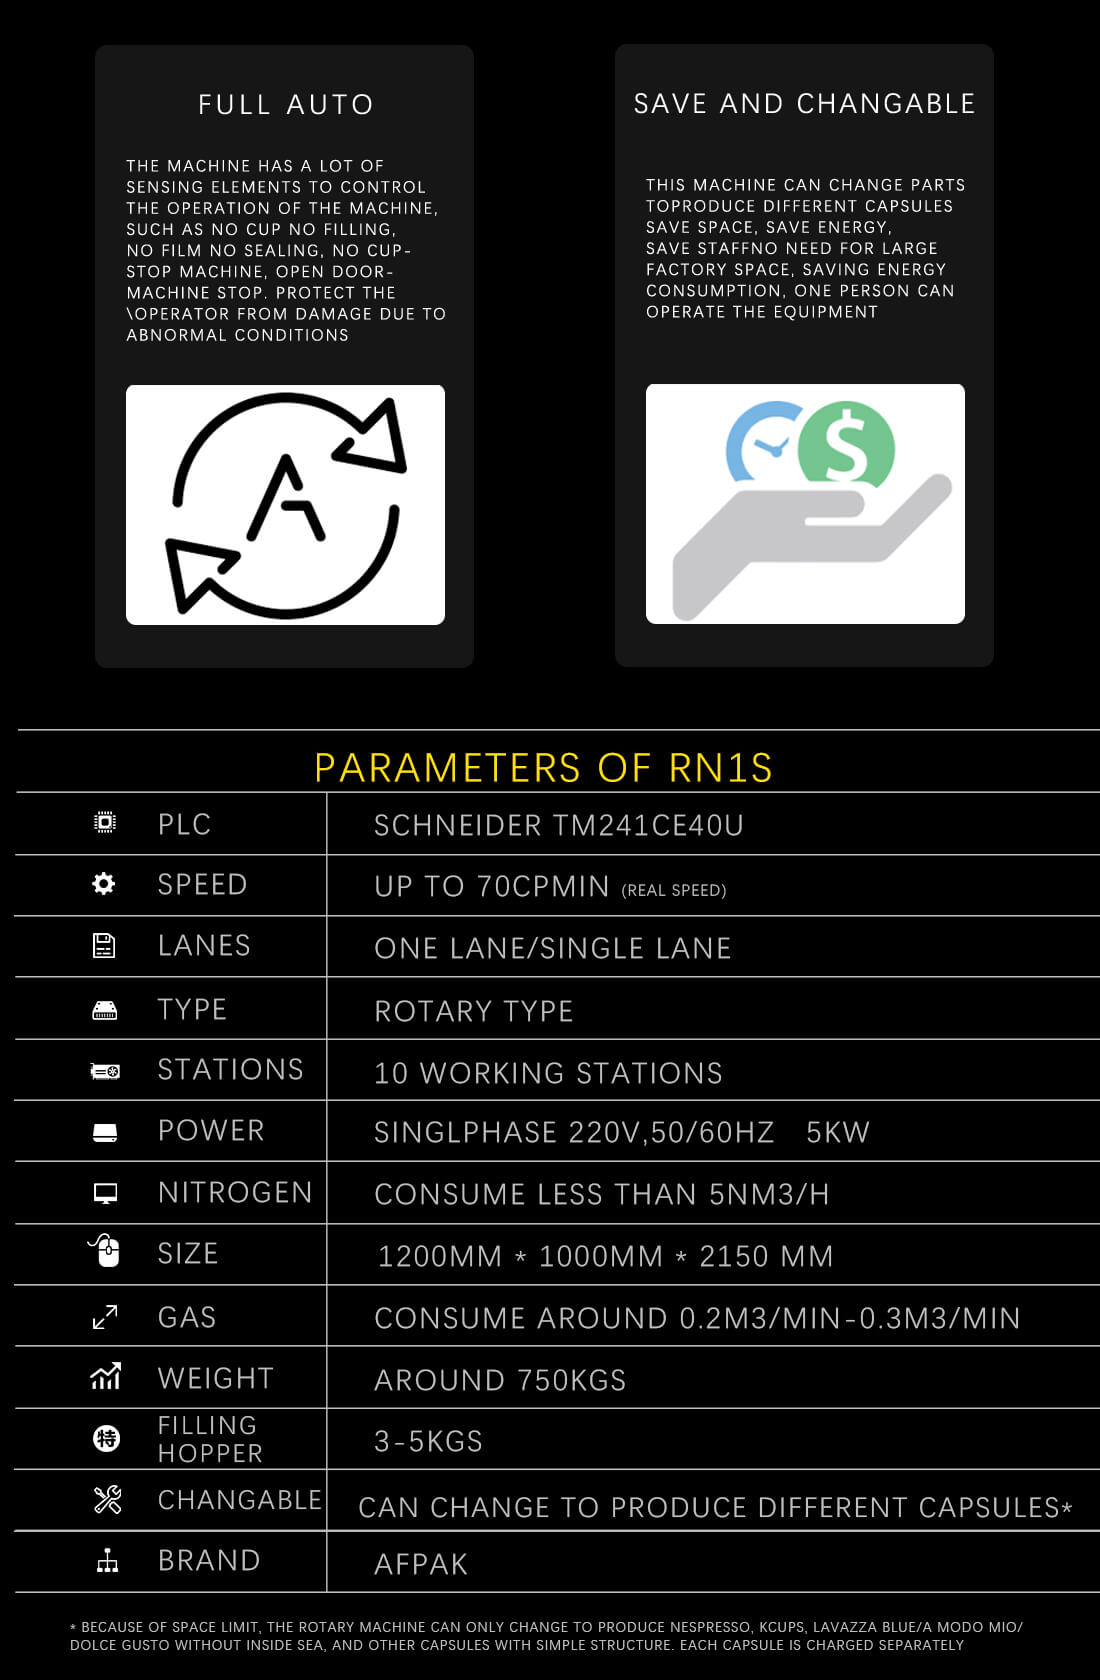
Figure 1 - Specifications
2.2 Bedrijfsomgeving
Deze machine is ontworpen om bij kamertemperatuur in een binnenomgeving te werken.
De machine is voorzien van zwenkwielen waardoor deze op een vlakke ondergrond kan worden verplaatst. Verwijder alle verbindingen en zet de zwenkarm vast voordat u deze verplaatst.
De temperatuur van het smeltlasapparaat is extreem hoog wanneer de machine in werking is. Als u aanpassingen aan de machine moet uitvoeren of onderhoudswerkzaamheden moet uitvoeren in de buurt van de verwarmingselementen, schakel dan de machine uit en laat deze eerst afkoelen.
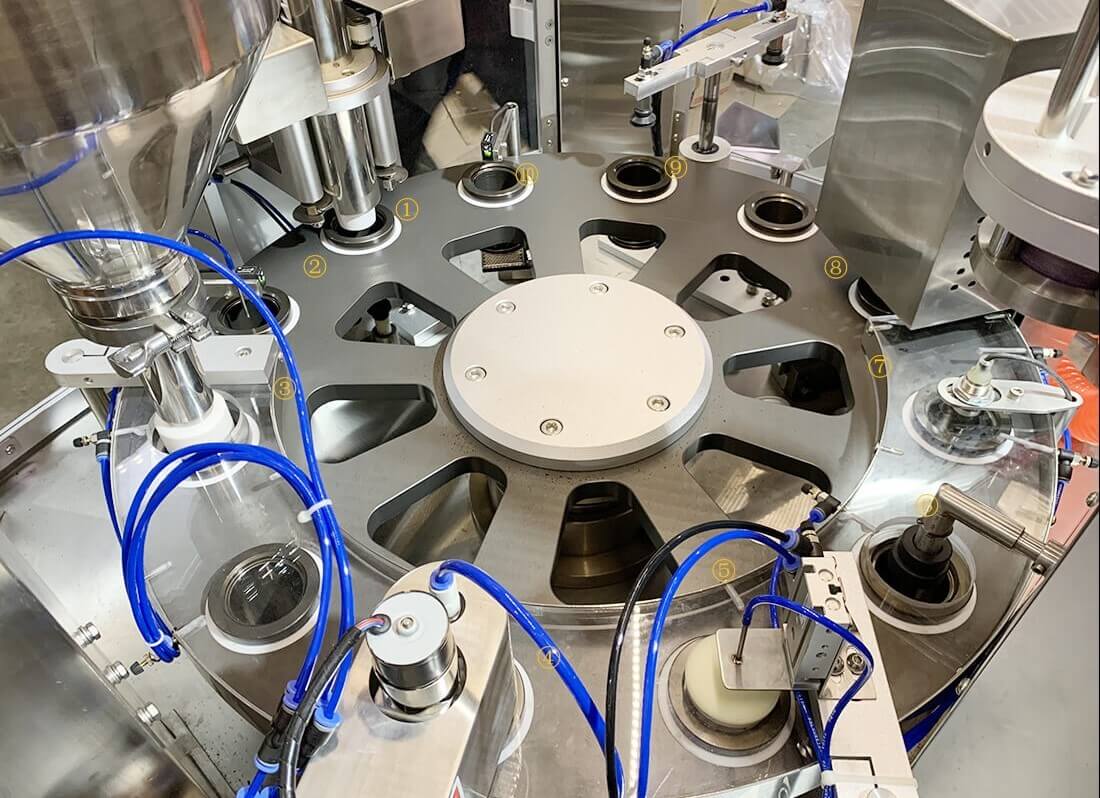
2.3 Machineoverzicht
Lees deze handleiding zorgvuldig door voordat u de machine installeert, om persoonlijk letsel en/of schade aan de machine te voorkomen.
Maak uzelf vertrouwd met de machine, de aansluitingen en de noodstopprocedure voordat u probeert deze te bedienen.
- Verticale capsuledruppelaar
- Bekersensor, als de bekerhouder leeg is, vult de machine de sleuf niet.
- Gemalen koffievuller door een servogestuurde vijzel.
- Randreiniging.
- Stikstofvulbuizen (blauwe buizen in diagram)
- Knip de papieren deksels uit en plaats ze erop.
- Dekselsensor.
- Dekselafdichting
- Capsule-uitvoer
- Capsulesensor, als het deksel niet correct is geplaatst, wordt de capsule meestal niet opgetild door de hefarm. De vulmachine voor het vullen van koffiecapsules stopt.
2.4 Machinetoegangscode
WAARSCHUWING: ALLEEN ervaren gebruikers mogen de programmeermodus openen.
2.5 Bediening Computerschermindelingen en toetsfuncties

Alle belangrijke functies worden bediend via het bedieningspaneel. De meeste elementen zijn in de fabriek voorgeprogrammeerd. Wijzig de instellingen niet voordat u de fabrieksinstellingen hebt vastgelegd.
- Hoofdaanraakscherm
- Handmatige bediening
- Automatische bediening
- Stop
- Noodstop
- Tweede hitteafdichting
Het bedienen van elke functie is vrij eenvoudig, er zijn 2 werkingsmodi. AUTOMATISCH en HANDMATIG. In de meeste gevallen zal de machine in de AUTOMATISCHE MODUS werken.
Druk op AUTOMATISCH op het bedieningspaneel en druk vervolgens op AUTO knop C – START.
De machine werkt automatisch voor alle functies.
Als u een specifieke functie wilt besturen, laat u de machine in MANUELE MODUS staan, selecteert u de gewenste functie op het bedieningspaneel en drukt u vervolgens op AUTO-knop C – om te starten.[/vc_column_text][/vc_column][/vc_row][vc_row ][vc_column][vc_column_text]
3 Installatie en voorbereiding voor koffiecapsule Vullen Sluitmachine
Volg de volgende procedure.
3.1 Voeding – 240 Volt 50 Hz
Sluit de meegeleverde voedingskabel aan op een stopcontact van 240 V, 50 Hz, 10 AMP.
Na het aansluiten van de voedingskabel. Zet de machine aan met de aan/uit-schakelaar.
3.2 Temperaturen instellen
De temperaturen voor de twee sealunits worden ingesteld door de twee controlemeters op het bedieningspaneel. De bovenste meter (Meter G) stelt de temperatuur van de cutter en de eerste sealunit in.
De onderste meter (Meter F) stelt de temperatuur van de tweede sealunit in.
Om de temperatuur in te stellen, drukt u op de knoppen omhoog/omlaag totdat de gewenste temperatuur is bereikt. Deze waarde wordt in GROEN weergegeven.
Het apparaat warmt op en de werkelijke temperatuur wordt weergegeven. Zodra de werkelijke temperatuur voor beide temperatuurmeters is bereikt, kunt u beginnen met het maken van capsules.
3.3 Perslucht – Blauwe regelaar
Sluit perslucht aan op de volgende inlaat met behulp van de meegeleverde aansluitingen of indien nodig met nieuwe connectoren.
B - On/off switch, push in to switch air supply on, pull out to turn air supply.
Om de luchtdruk aan te passen, trekt u A uit om een luchtdruk naar de unit te leveren tussen 0,6 bar en 0,8 bar, zoals weergegeven in meter C.
Zorg er na eventuele aanpassingen voor dat C weer naar beneden wordt gedrukt in de vergrendelde positie.

3.4 Stikstof – Rode regelaar
Koffie is een delicaat product. Om de oxidatie van de koffie in portieverpakkingen te voorkomen, wordt tijdens het doseren stikstofgas gebruikt totdat de capsules zijn afgesloten en de zuurstof is verwijderd.
De stikstofspoeling wordt automatisch afgehandeld door de capsuleverpakkingsmachine. De enige vereisten zijn het aansluiten van een fles voedselveilige stikstof op de machine.
Om de luchtdruk aan te passen, trekt u D uit om een luchtdruk naar de unit te leveren van tussen 0,1 MPA, zoals weergegeven in meter E.
De stikstofgasdruk moet 0,1 MPA zijn met een stroomsnelheid tussen 200 en 500 liter/MIN.
Gebruik stikstof van voedingskwaliteit.
3.5 Capsules laden
Laad lege capsules via de capsulebuis.
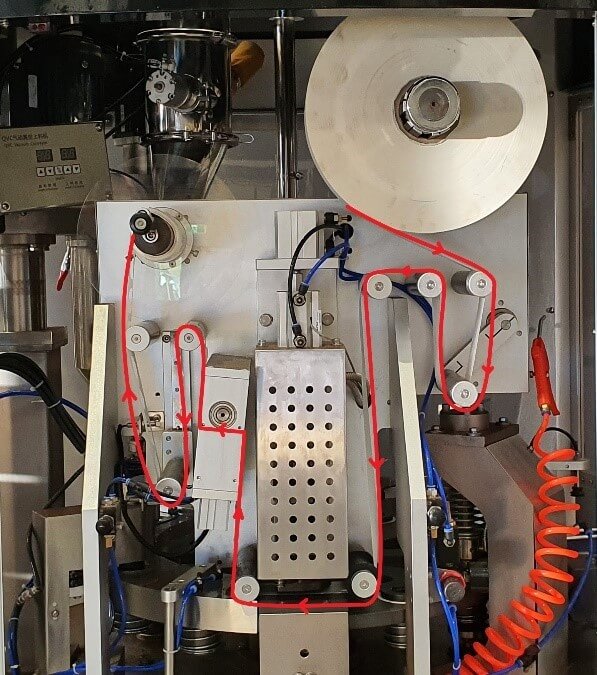
3.6 Papier echt laden
Laad het echte papier door de onderstaande stappen te volgen.
3.7 Programming the dosage
Set the desired weight of the capsule, in this example we will is 5.5g. To calibrate this weight, you will then need to adjust the FEEDING SUBDIVISION values. The Larger the value, the lower filling quantity, the smaller value, the greater filling quantity. A good starting point is 1.34.
| Functie | Beschrijving |
| Filling Serve Turn on 100 Shut 200 - this is to control the filling servo on and off time | NO NEED TO ADJUST THIS VALUE – FACTORY SET |
| Topping device Turn on Shut 300 – This is the capsules lift and down time. | NO NEED TO ADJUST THIS VALUE – FACTORY SET |
| Stirring time 1.0 s This is the delay time to the next stirring cycle when stirring is not set to continuous mode. | NO NEED TO ADJUST THIS VALUE – FACTORY SET |
| Cup testing to topping 0 - no cup no filling | NO NEED TO ADJUST THIS VALUE – FACTORY SET |
| Weight added 5.5 g – You can set this value to the filling weight you want to get | Adjust this value for the desired output weight |
| Filling Serve Turn on 100 Shut 200 -this is to control the filling servo on and off time from Programmer value | NO NEED TO ADJUST THIS VALUE – FACTORY SET |
| Feeding Subdivision: This is to adjust the filling accuracy, if the measured weight does not meet the set value (Weight added 5.5 g), you can calibrate with this value. Adjust the feeding subdivision: The Larger the value, the lower filling quantity, The smaller value, the greater filling quantity | Adjust this value to calibrate. A good starting point is 1.34 |
| SERVO speed No need to change normally, this is the servo motor running speed. | NO NEED TO ADJUST THIS VALUE – FACTORY SET |
| SERVO Acceleration. This is to adjust the servo motor acceleration, The lower the value the faster the speed. | NO NEED TO ADJUST THIS VALUE – FACTORY SET |
| Servo Deceleration: To adjust the servo motor stop, the larger the value the longer it will take to stop. | NO NEED TO ADJUST THIS VALUE – FACTORY SET |
| SERVO. This is the servo motor running speed. | NO NEED TO ADJUST THIS VALUE – FACTORY SET |
| Filling times after less material | NO NEED TO ADJUST THIS VALUE – FACTORY SET |
Figure 8 - programming of dosage
3.8 Setting the cup capsule counter
You can program the machine to set up a predefined number of capsules. Once the machine reaches the programmed amount of capsules the machine will automatically stop and an alarm with sound.
To set the programmed quantity:
Select COUNTING STOP and enter desired number of capsules
Activate CUPCOUNT
Machine will automatically stop after the programmed amount of cups
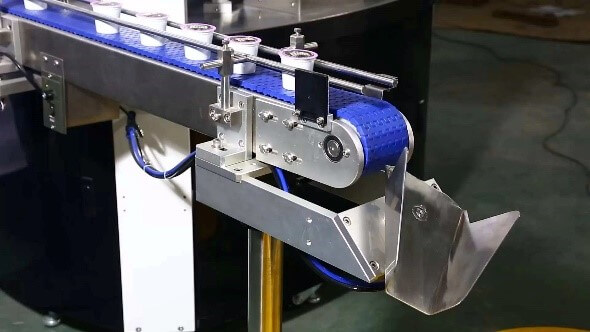
3.9 Counting the number of capsules at the end of the conveyor belt
You can program the machine to set up a predefined number of capsules at the end of the conveyor belt before the chute changes position.
Once the machine reaches the programmed number of capsules the chute will change positions. This allows the counting of capsules per carton before packing.
To set the programmed quantity.
4 Loading the ground coffee
4.1 About the Ground Coffee loader.
The ground coffee loader will automatically load the auger with ground coffee.
Controleer de aansluitingen voordat u ermee aan de slag gaat.
- Luchttoevoer
- Elektrische lijnaansluiting
- Buisje voor gemalen koffie

4.2 Het laden en lossen van de gemalen koffie
- Maak het filter schoon.
- Zet de machine op “AUTOMATISCH”
- Druk op de AAN/UIT-knop op de vacuümtoevoerbox om de vacuümtoevoer AAN te houden. OPMERKING: Dit moet elke keer gebeuren dat u de machine inschakelt. De vuller werkt automatisch als de trechter gevuld moet worden.
- Na het draaien OP de feeder, er zit een sensor op de vultrechter om de vacuümfeeder/transportband te controleren en te regelen.

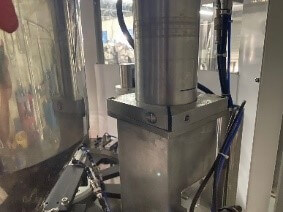
4.3 Het reservoir voor gemalen koffie legen
Please do not leave ground coffee in the hopper. It should be packed in capsules or removed once you have finished packing for the day.
To empty the Hopper and the auger please follow the instructions below.
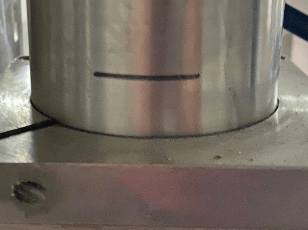
- Loosen the screw below the Auger.
- On control panel, Switch to MANUAL
- Select FILLING En STIR on the touchscreen
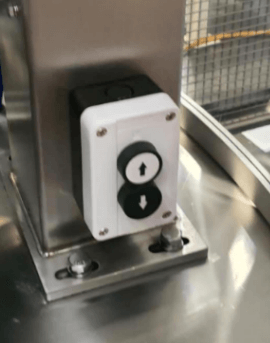
- Use buttons to lift the Auger, swing out and empty coffee.
- Once you have aligned the hopper away from the machine and have a container under the spout,
- Turn off FILLING
- Active the EMPTY HOPPER En STIR
- Once the AUGUR is empty – Turn off EMPTY HOPPER En STIR
- To reverse the process and put the machine back to normal operational mode.
- Use button to move Augur down.
- Tighten the screw to lock into position.
5 OPERATING the MACHINE
5.1 Language selection
Figure 15 - Language select
Press (hold 3 seconds) the Chinese flag, change to Chinese language on the control panel.
Press (hold 3 seconds) the U.K. flag, change to English language on the control panel.
5.2 Operating the machine in automatic mode
De machine werkt normaal gesproken in de AUTOMATISCHE modus zonder dat de operator enige parameters hoeft aan te passen.
- Het is belangrijk dat de machine vrij is van alle capsules voordat u de machine start.
- Turn on machine and wait until it reaches temperature on the front Control Panels
- Zorg ervoor dat de luchtdruk correct is.
- Open de stikstofinfusie.
- Schakel de vacuüminvoer in
- Laad Gemalen koffie
- Laad lege capsules in de capsulehouder
- Zet de machine erin AUTOMATISCHE MODUS
- Druk op de GROENE knop ‘C’ AUTOMATISCH op het bedieningspaneel
- Druk op de RODE knop ‘D’ om de machine op elk moment te stoppen.
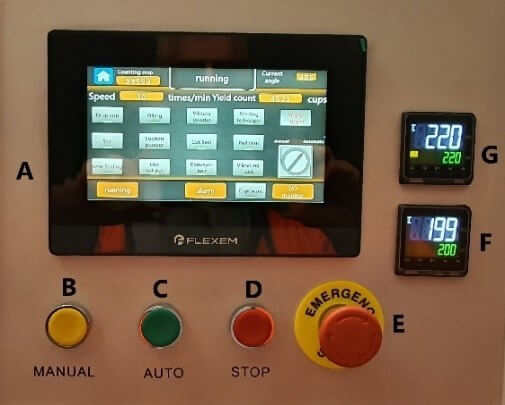
Figure 16 - Control buttons on panel

Figure 17 - Main machine synoptic
5.3 Operating functions manually
It is possible to operate individual or multiple elements manually for the purposes of testing or cleaning.
Select a function from the control panel.
- Example select CONVEYER BELT
- Press the GREEN ‘C’ Button AUTOMATIC on the control panel to start
- Press the RED ‘D’ Button to stop the machine at any time.
- Example select PULL FILM
- Press the GREEN ‘C’ Button AUTOMATIC on the control panel to start
- Press the RED ‘D’ Button to stop the machine at any time.
6 Programming mode
6.1 MACHINE Synoptic
This is page to enter the parameters settings. Do not make any changes without conforming with the manufacturer. The passcode is 198888.
6.2 Auto running page
This is page to enter the parameters settings. Do not make any changes without conforming with the manufacturer. The passcode is 198888.

Figure 18 - Machine Synoptic
The machine Synoptic chart shows the main operational elements of the machine. When the machine is in MANUAL MODE, selecting one of the key functions will take you to the programming functions for that part of the process.
Key programming functions:
- DROP CUP
- FILLING
- SUCTION POWDER
- CUT SEAL
- HEAT SEALING
- CUP OUTPUT - parameters set to protect the cylinder when machine is stop
- Heating - is to turn on the heating No. 5 and No.6. Press to turn ON/OFF
- Current angle: the rotary disc position now when running (set in the machine programmer)
- Stopping Position: the rotary disc running time (set in the machine programmer)
- Home page: press to back to home page
- Short cut to the running screen
- Short cut to the alarm screen
- Short cut to the I/O monitor screen
6.3 RUNNING
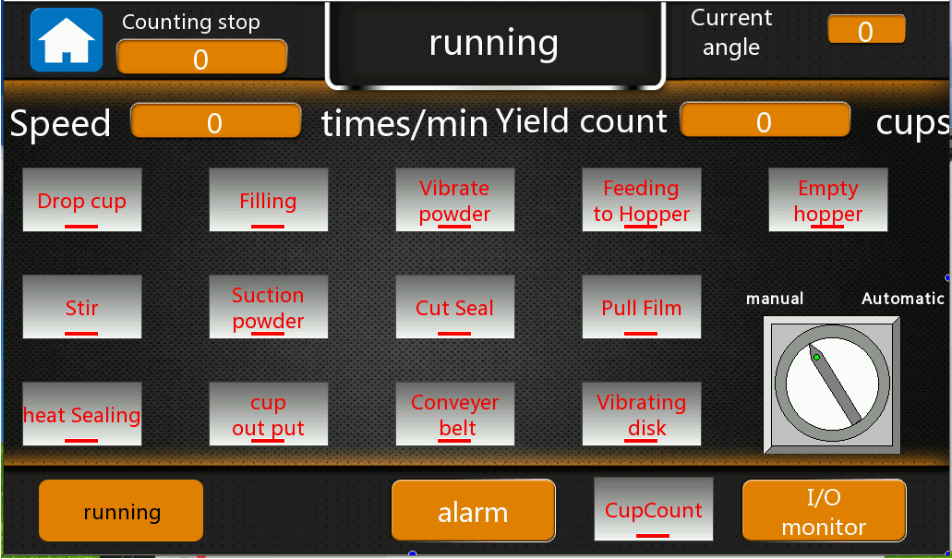
Figure 19 - Main running screen
This is the main screen that is used to operate the machine. Place the machine in Automatic and then press Button C (green button) to run the machine. Refer 8 Operating the machine.
- Drop cup: to control the drop cup
- Filling: to control the filling station
- Vibrate powder: to control the filling vibration
- Feeding to hopper: To control the vacuum feeder
- Empty Hopper: the function to clean the hopper
- Stir: to control the stir motor
- Suction powder: to control the capsules edge cleaning station
- Cut seal: to control the cut and seal station
- Pull film: to control the pull film motor
- Heat sealing: to control the second sealing station
- Cup output: to control the cup output
- Conveyor belt: control the belt running
- Vibrating disk: to control the vibrating capsules feeding system (optional function
- Cup count: to control the cup counting function
- Manual/Automatic: If Manual mode, all functions are not working, you need to press the one you want to working, then press the green button under the screen to test this function; If auto mode, all functions will work
6.4 DROP CUP
The drop cup programming screen is entered by touching on DROPPED CUP on the synopsis.
Manual operations include:
- Drop Cup. press to run this function in Manual module. only press the button, then the function will operate. In Auto module, all the functions will operate.
Programming functions.
- Yield count: to count how many capsules have been produced.
- Speed: the machine running speed.
- Manual/Automatic: switch to auto running or manual running of the machine.
- Drop Cylinder: set the parameters to control the drop cup cylinder when to work and stop
- Cup drop up/down: set the parameters to control the cup up/down cylinder when to work and stop
- Cup drop vacuum: set the parameters to control the drop cup vacuum suction when to work and stop
- Cup test: is the sensor parameters to detector when to work/stop
- Number of cups drops after cup absence: set to value to stop the machine after how many capsules absence in the rotary disc
- Instructions: is the function working signal
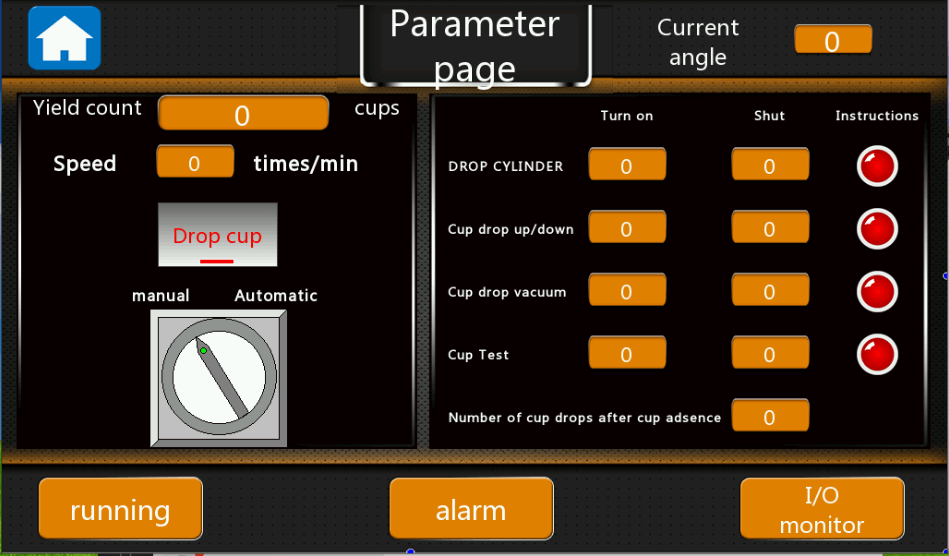
Figure 20 - Drop cup Parameter Page
6.5 FILLING
Enter the filling programming menu by selecting the filling indicator on the synoptic. This programming menu will allow you to adjust key ground coffee filling values for the machine. You should limit any changes in this programming screen as most values are factory set.
Typically, you will only need to adjust the Weight added field.
Calibration is done through the Feeding Subdivision field.
- Filling Servo.
- Topping device.
- Stirring time.
- Cup testing to topping.
- Weight added 5.5 g – You can set this value to the filling weight you want to obtain.
- Filling Serve.
- Feeding Subdivision. This is to adjust the filling accuracy, if the measured weight does not meet the set value (Weight added 5.5 g), you can calibrate with this value.
- SERVO speed.
- SERVO Acceleration. This is to adjust the servo motor acceleration, The lower the value the faster the speed.
- Servo Deceleration. To adjust the servo motor stop, the larger the value the longer it will take to stop.
- Filling times after less material.

Figure 21 - Capsule filling Parameter Page
6.6 VIBRATE POWDER
- Suction powder: to clean the powder on the capsules edge for better sealing
- Manual/automatic: in Manual module, only press the button, then the function will work. In Auto module, all the functions will work.
- Tamp Cylinder: to control when the tamp cylinder will work/ stop
- Vacuum suction: to control when the vacuum suction will work/ stop
- Powder detected to sucking: to set how many stations between the cup detector sensor to the suction powder station.
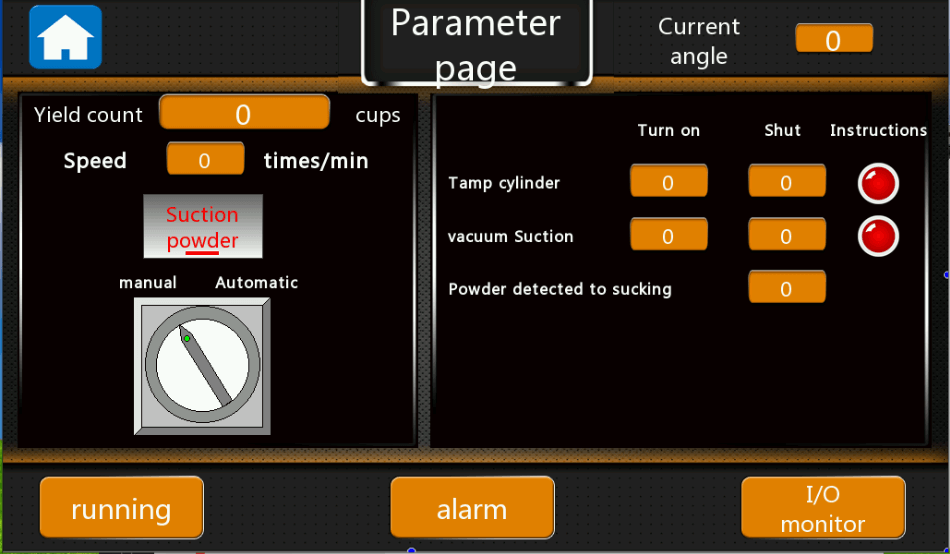
Figure 22 - Parameters page for suction powder
6.7 CUT SEAL
Enter the CUT SEAL programming menu by selecting the CUT SEAL indicator on the synoptic. This programming menu will allow you to adjust film real parameters for the machine. You should limit any changes in this programming screen as most values are factory set.
- Cut seal: to control the cut and seal cylinder.
- Put film: to control the pull film cylinder.
- Manual/auto: in Manual module, only press the button, then the function will work. In Auto module, all the functions will work.
- Manual punctuation: this is for the film with eye mark, press this button, and then the film will auto running and stop at the eye mark detected by the sensor.
- Calibration: is to control the machine to pull the film to the set length.
- Cutting cylinder: to control when the cutting cylinder work/stop,
- Film cutting heat seal: to control when the heat seal work/stop.
- Film drawing servo: to control when film pull servo work/stop.
- Cup test to cut the membrane: to set how many stations between the cup detector sensor to the film cutting station.
- Cup test to pull film: to set how many stations between the cup detector sensor to the pull film station.
- Pull speed: to control the film pull speed.
- Film accelerate: to control the servo motor when to accelerate to pull film more.
- Film Deceleration: to control the servo motor when to decelerate to pull film slowly.
- Film length I: to set the first step to pull how many films pull at one time.
- Film length II: to set the second step to pull how many films ay one time.
- Pull film compensation: to adjust the pull film accuracy.
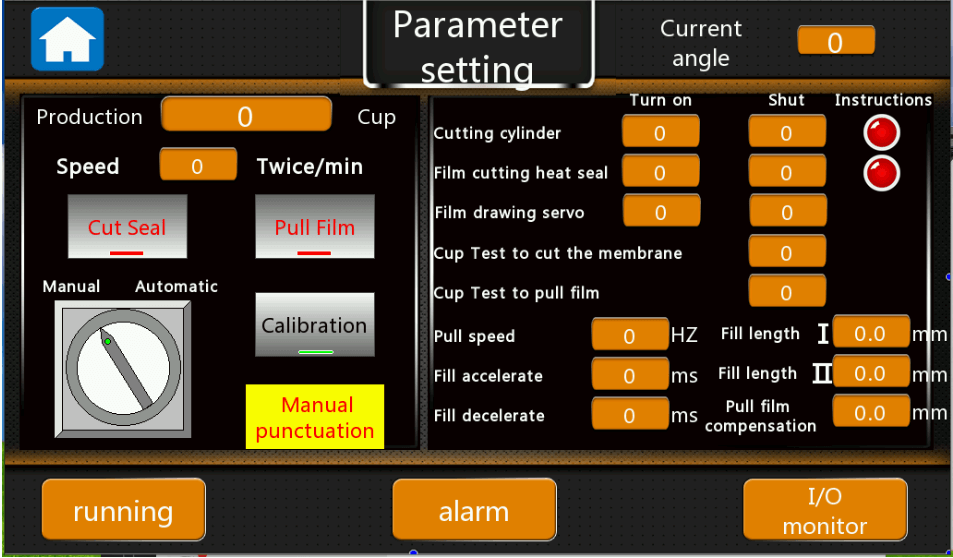
Figure 23 - Parameters page to seal and cut film
6.8 HEAT SEALING
Enter the HEAT SEALING programming menu by selecting the HEAT SEALING indicator on the synoptic. This programming menu will allow you to adjust the mechanical up down timings associated with the heat sealer. You should limit any changes in this programming screen as most values are factory set.
- Heat sealing: for the second sealing station working.
- Heat seal up/down: to control when the up/down cylinder working.
- Cup detected to heat seal: to set how many stations between the cup detector sensor to the second sealing station.
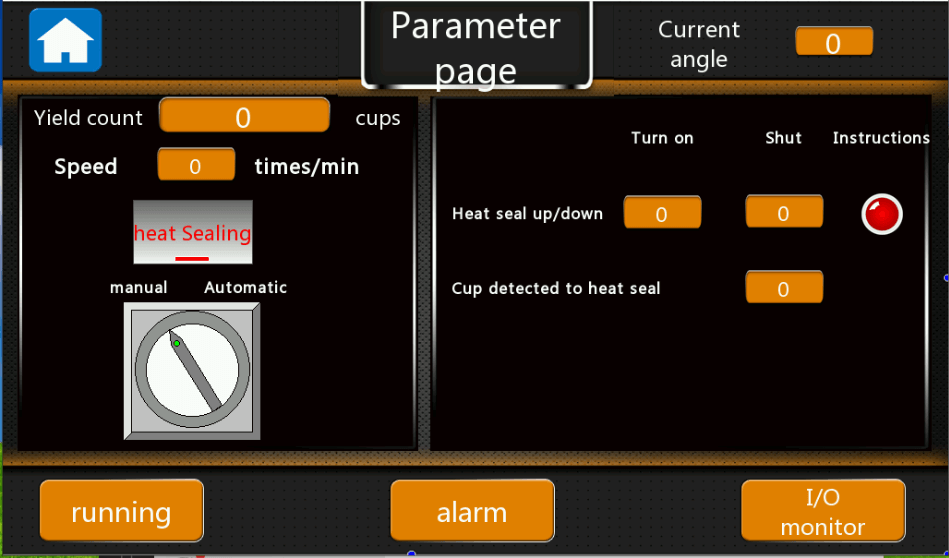
Figure 24 - Parameters setting for heat sealing
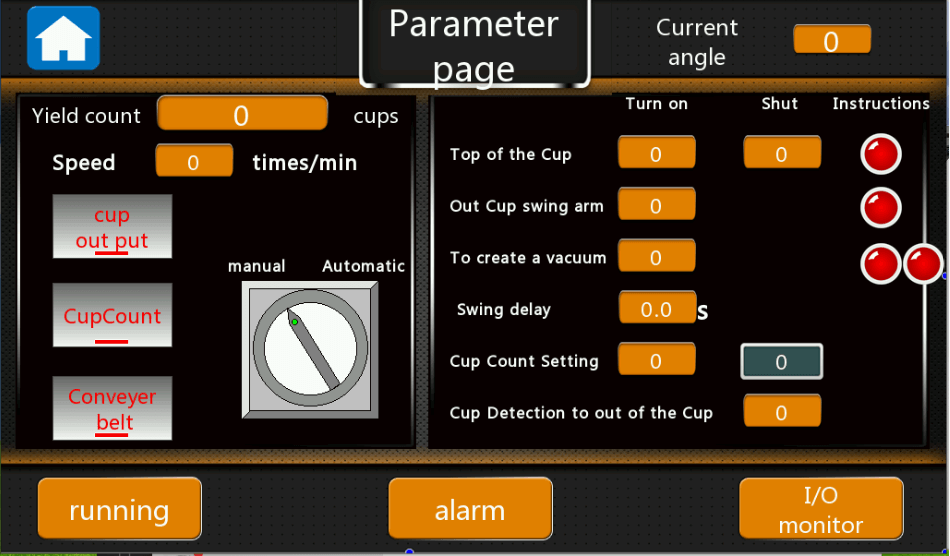
6.9 CUP OUTPUT
Enter the CUP OUTPUT programming menu by selecting the CUP OUTPUT indicator on the synoptic.
This programming menu will allow you to adjust the mechanical arm associated with the cup output. You should limit any changes in this programming screen as most values are factory set.
- Cup output: to control cups output.
- Cup count: to detector how many cups output and then flip over.
- Conveyor belt: to control the conveyor belt.
- Top of the cup: to control the cup up/down work/stop.
- Out cup swing arm: to control the swing arm work/stop time,
- To create a vacuum: to control when the cup suction vacuum will work.
- Swing delay: to control the delay time between twice working.
- Cup count setting: to set how many cups count and then swing to another side.
- Cup detection to out of the cup: to set how many stations between the cup detector sensor to the cup output station.
6.10 Alarms overview
Figure 26 - Alarm Screen

Figure 26 - Alarm Screen of coffee capsule filling sealing machine AFPAK Emergency stop: the machine is under the emergency stop now, Please turn the emergency stop button and press the red button below the touch screen to clear the alarm
- Insufficient silo, please feed: the powders inside the filling hopper is not enough, please feed more
- Hopper shortage alarm: the hopper is shortage, please feed more
- Mainframe failure: Variable frequency failure caused by voltage instability, confirm the input voltage to ensure the stability of the voltage;
- Cup output cylinder protection: something wrong with the cup output cylinder, please check
- Counting stop: the machine produced the quantity meet the set value on the screen, please reset the count value.
- Host location stuck: the host position is stuck, please check the main motor
- Drop cup cylinder protection: the drop cup up/down cylinder is stuck
- Film empty shutdown: the film is out of supply, please supply more.
- Low air pressure protection: the machine air pressure is less than 0.6MPA, please feed more air
- Cup bin without cup shutdown: please feed more capsules on the capsules bin
- Film cutting servo failure: please check the servo motor driver error code
- Security door protection: the doors are open, machine will not working
- Die stop with object: the rotary disc is stuck by something, please kindly check
- Broken film protection: the film is broken
- Fill 1 servo failure: Filling servo motor doesn’t work
- Laminated protection: something wrong with the push film cylinder
- Cut film heat seal protection: something wrong with the cut and seal station
- When have the alarm, please kindly check the position clearly, solve the errors, and then press the red “Stop” button below the screen, then the machine will run again.

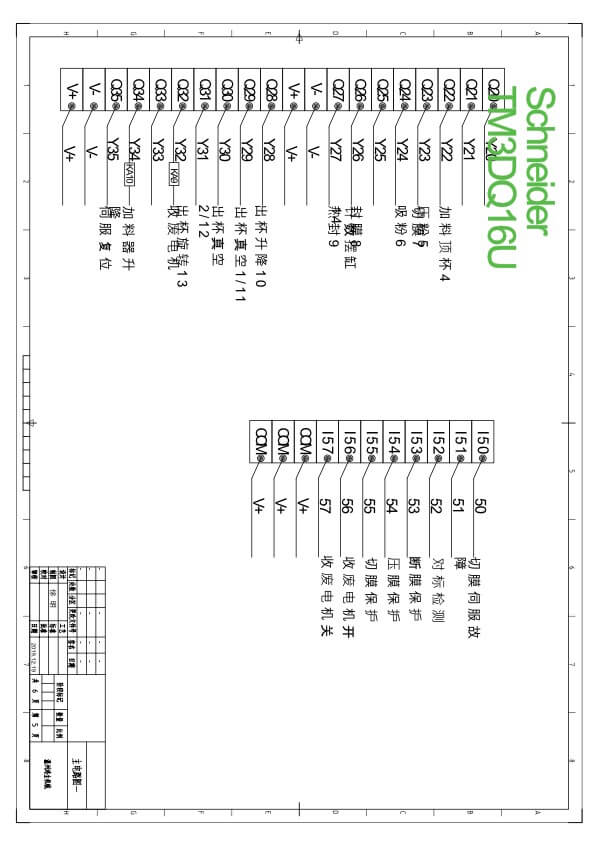
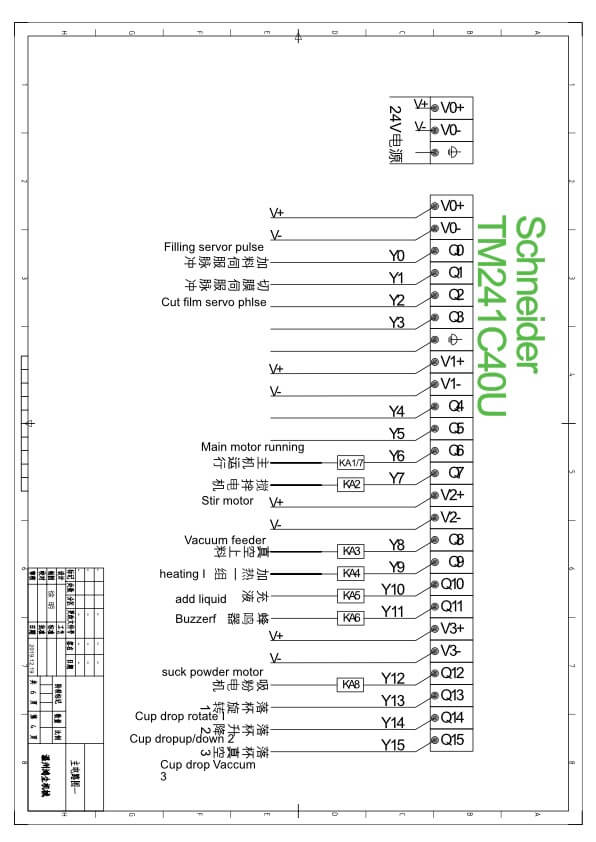
6.11 I/O MONITOR
7 Password
This is page to enter the parameters settings. Do not make any changes without conforming with the manufacturer. The passcode is 198888.
8 Key Contacts
Jeffree Cao
SHANGHAI AFPAK CO., LTD
Web: www.afpakmachine.com
WhatsApp: +86-15618866167
Skype: allenanf
E-mail: anf717@gmail.com info@anfpak.com
9 Regulatory Requirements
[Enter information describing regulatory and policies compliance requirements or provide a reference to where it is stored.]
10 Coffee capsule filling sealing machine Common issues and troubleshooting
In the process of operation, the improper operation and settings, and mechanical parts, electrical components damaged and other reasons, will cause the machine does not work, please first find the reason, from table following and take effective measures. If the problem still cannot be solved, please contact the supplier.


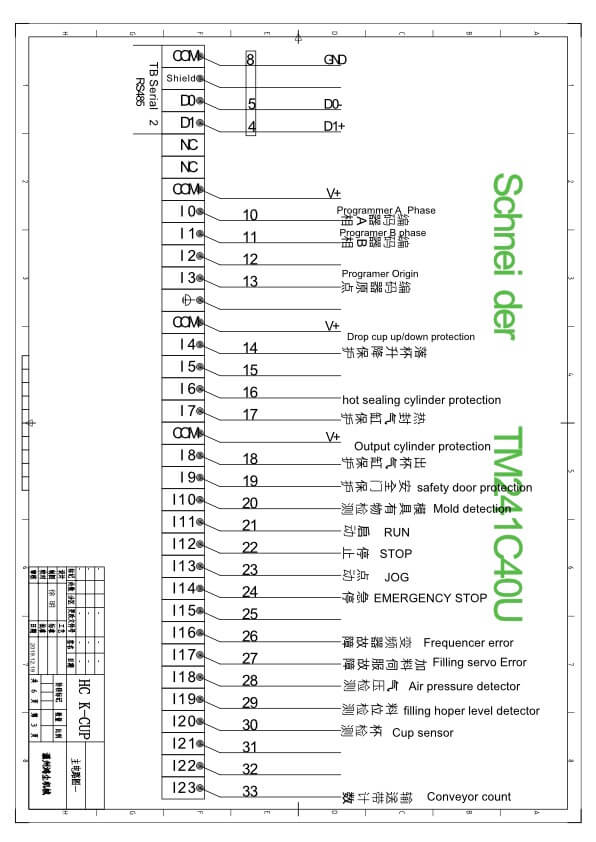
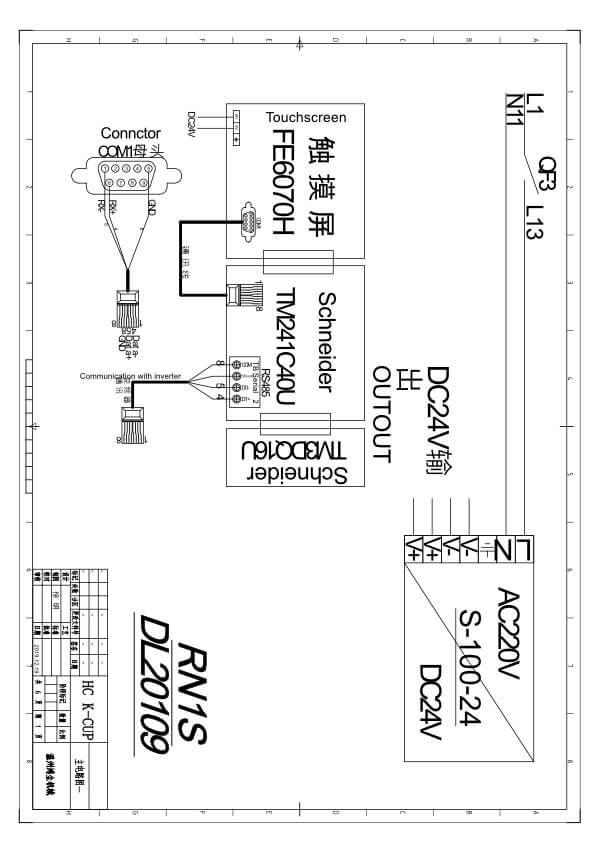
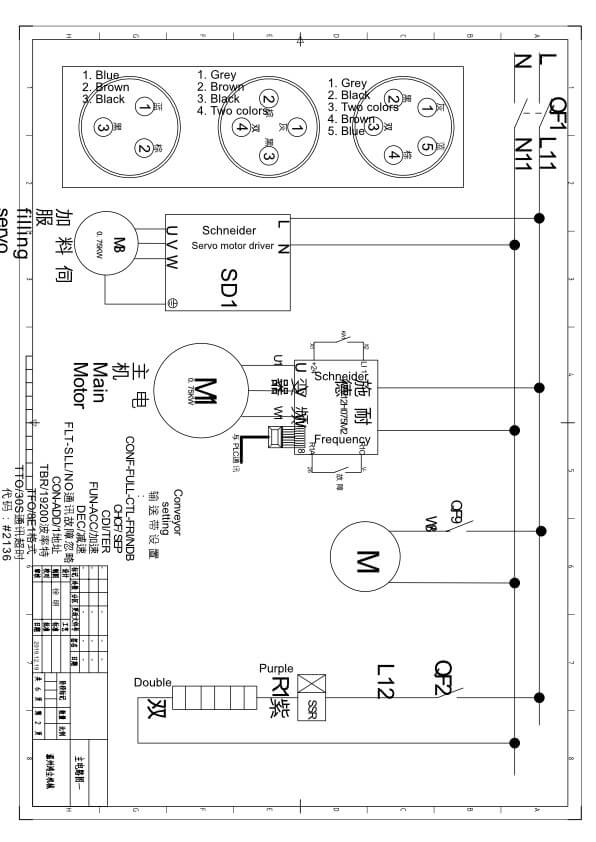
APPENDIX B: Electrical Diagrams of Coffee capsule Filling Sealing Machine
11 Machine technical parameters
Note: This machine can only package a certain specification capsule, if you change the capsules size, then need to change the mold plate.
| Beschrijving | Parameter |
| Max filling powder weight | 8-15g |
| Verpakkingssnelheid | 50-70 capsules/min |
| Coffee filling accuracy | ± 0,2 g |
| Laying-off station | 1 |
| Net weight of the machine | 750Kg |
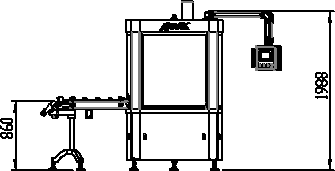
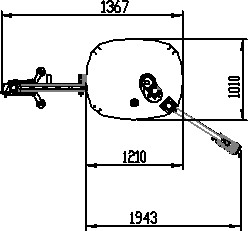
| Machine case size | 1745mm(length)X1150mm(width) X2850mm(height) |
Figure 27 - Machine parameters
12 Machine Dimensions