ROTARY RN1S เครื่องบรรจุแคปซูลกาแฟ RN1S
คู่มือการใช้งานและบำรุงรักษา
*คู่มือนี้สามารถใช้ได้กับเครื่องซีลบรรจุแคปซูลกาแฟ RN1S ทั้งหมด ไม่ว่าคุณจะผลิต Nespresso, ถ้วย K, Lavazza, Dolce Gusto ฯลฯ ทั้งหมดก็สามารถทำตามเครื่องนี้ได้ ขอบคุณ
สารบัญ
(จากหน้านี้คุณจะเห็นเนื้อหาดังต่อไปนี้ และคุณสามารถคลิกเนื้อหาที่คุณต้องการเพื่อข้ามไปยังคำอธิบายโดยละเอียดได้)
1.3 เครื่องซีลบรรจุแคปซูลกาแฟเป็นอันตราย 5
2.5 ควบคุมเค้าโครงหน้าจอคอมพิวเตอร์และฟังก์ชันหลัก 8
3 การติดตั้งและการเตรียมการดำเนินงาน 9
3.1 กำลังไฟฟ้า – 240 โวลต์ 50 เฮิรตซ์ 9
3.3 เครื่องอัดอากาศ – ตัวควบคุมสีน้ำเงิน 9
3.4 ไนโตรเจน – เรกูเลเตอร์สีแดง 9
3.8 การตั้งเคาน์เตอร์แคปซูลถ้วย 11
3.9 การนับจำนวนแคปซูลที่ปลายสายพานลำเลียง 11
5 การใช้งานเครื่องซีลบรรจุแคปซูลกาแฟ.. 15
5.2 การใช้งานเครื่องในโหมดอัตโนมัติ 15
5.3 ฟังก์ชั่นการทำงานด้วยตนเอง 16
6.11 มอนิเตอร์อินพุต/เอาท์พุต.. 25
10 ปัญหาทั่วไปและการแก้ไขปัญหา 27
11 พารามิเตอร์ทางเทคนิคของเครื่องจักร 29
1 บทนำ
1.1 วัตถุประสงค์
ก่อนติดตั้งเครื่อง โปรดอ่านคู่มือนี้อย่างละเอียด เพื่อหลีกเลี่ยงการบาดเจ็บและ/หรือความเสียหายต่อเครื่อง
โปรดทำความคุ้นเคยกับเครื่องจักร การเชื่อมต่อ ขั้นตอนการหยุดฉุกเฉินก่อนที่จะพยายามใช้งาน
1.2 ผู้ชม
คู่มือนี้มีจุดมุ่งหมายเพื่อช่วยในการฝึกอบรมการทำงานขั้นพื้นฐานและการตั้งโปรแกรมของเครื่อง การทำงานของเครื่องจักรควรดำเนินการโดยเจ้าหน้าที่ที่ได้รับการฝึกอบรมภายใต้การดูแลด้านเทคนิคเท่านั้น
1.3 เครื่องบรรจุภัณฑ์เป็นอันตราย
การดำเนินการบรรจุภัณฑ์จำเป็นต้องมีการเคลื่อนย้ายแขนและจุดงัด ก๊าซไฟฟ้าแรงสูง และแรงดันสูง ซึ่งทั้งหมดนี้อาจทำให้เกิดอันตรายร้ายแรงได้
- จำเป็นอย่างยิ่งที่บุคลากรทุกคนที่ใช้งานเครื่องจักรจะต้องได้รับการฝึกอบรมอย่างถูกต้องและปฏิบัติตามกฎความปลอดภัยในคู่มือนี้
- กรุณาอย่าถอดยามรักษาความปลอดภัยหรือปิดสัญญาณเตือนภัยที่ประตู เนื่องจากอาจเป็นอันตรายและอาจก่อให้เกิดอันตรายร้ายแรงต่อผู้ปฏิบัติงาน
- ผู้ปฏิบัติงานจะต้องมีความเหมาะสมทั้งทางร่างกายและสติปัญญาในการปฏิบัติงาน พวกเขาเป็นคนเดียวที่ได้รับอนุญาตให้เข้าใกล้เครื่องจักร และถูกบังคับให้ทำงานที่กำหนดไว้ล่วงหน้าเท่านั้น ซึ่งพวกเขาได้รับการฝึกอบรมอย่างถูกต้องแล้ว
- เฉพาะเจ้าหน้าที่ด้านเทคนิคที่ได้รับอนุญาตเท่านั้นที่สามารถดำเนินการบำรุงรักษาเครื่องได้
- ไม่อนุญาตให้บุคลากรที่ไม่ได้รับอนุญาตทำความสะอาดเครื่องจักรในขณะที่ทำงาน
- อย่าทิ้งเครื่องทิ้งไว้โดยไม่มีใครดูแลในขณะที่เครื่องทำงาน
- เฉพาะบุคลากรที่มีคุณสมบัติเหมาะสมเท่านั้นที่ควรใช้งาน บำรุงรักษา และซ่อมแซมเครื่อง
- หยุดใช้เครื่องหากเกิดความเสียหายและทำการซ่อมแซมทันที
- ประตูแผงไฟฟ้าจะต้องปิดอยู่เสมอ
- ในขณะที่เครื่องจักรทำงาน ควรใส่ใจกับเสียงที่ผิดปกติ หากคุณได้ยินสิ่งผิดปกติ ให้หยุดเครื่องและตรวจสอบทันที
1.4 ประตูรักษาความปลอดภัย
ด้วยเหตุผลด้านความปลอดภัย ไม่ควรเปิดประตูในขณะที่เครื่องกำลังทำงาน มีสวิตช์ใกล้เคียงที่ประตูทางเข้าเครื่อง เมื่อประตูเปิดอยู่ ระบบจะหยุดเครื่องโดยอัตโนมัติ ส่งเสียงเตือน และเริ่มไฟแฟลชกะพริบ
ข้อควรระวัง อันตรายด้านความปลอดภัย: สำหรับผู้ปฏิบัติงานและพนักงานซ่อมบำรุงที่มีประสบการณ์ อาจจำเป็นต้องเปิดประตูและให้เครื่องจักรทำงาน ในกรณีนี้ คุณสามารถปิดใช้งานฟังก์ชันประตูนิรภัยได้จากหน้าจอสัมผัส
1.5 การหยุดฉุกเฉิน
In an emergency, you can press the red "stop" button on the machine, the machine will stop running immediately. After troubleshooting, then you can reset the button. Turn it right to reset.[/vc_column_text][/vc_column][/vc_row][vc_row][vc_column][vc_column_text]
2 คำอธิบายระบบ
2.1 คุณสมบัติที่สำคัญ
เครื่องบรรจุและปิดผนึกกาแฟ ROTARY RN1S เป็นเครื่องบรรจุแคปซูลอัตโนมัติแบบปิดเต็มรูปแบบที่สามารถทำงานได้สูงสุด 70 แคปซูลต่อนาที
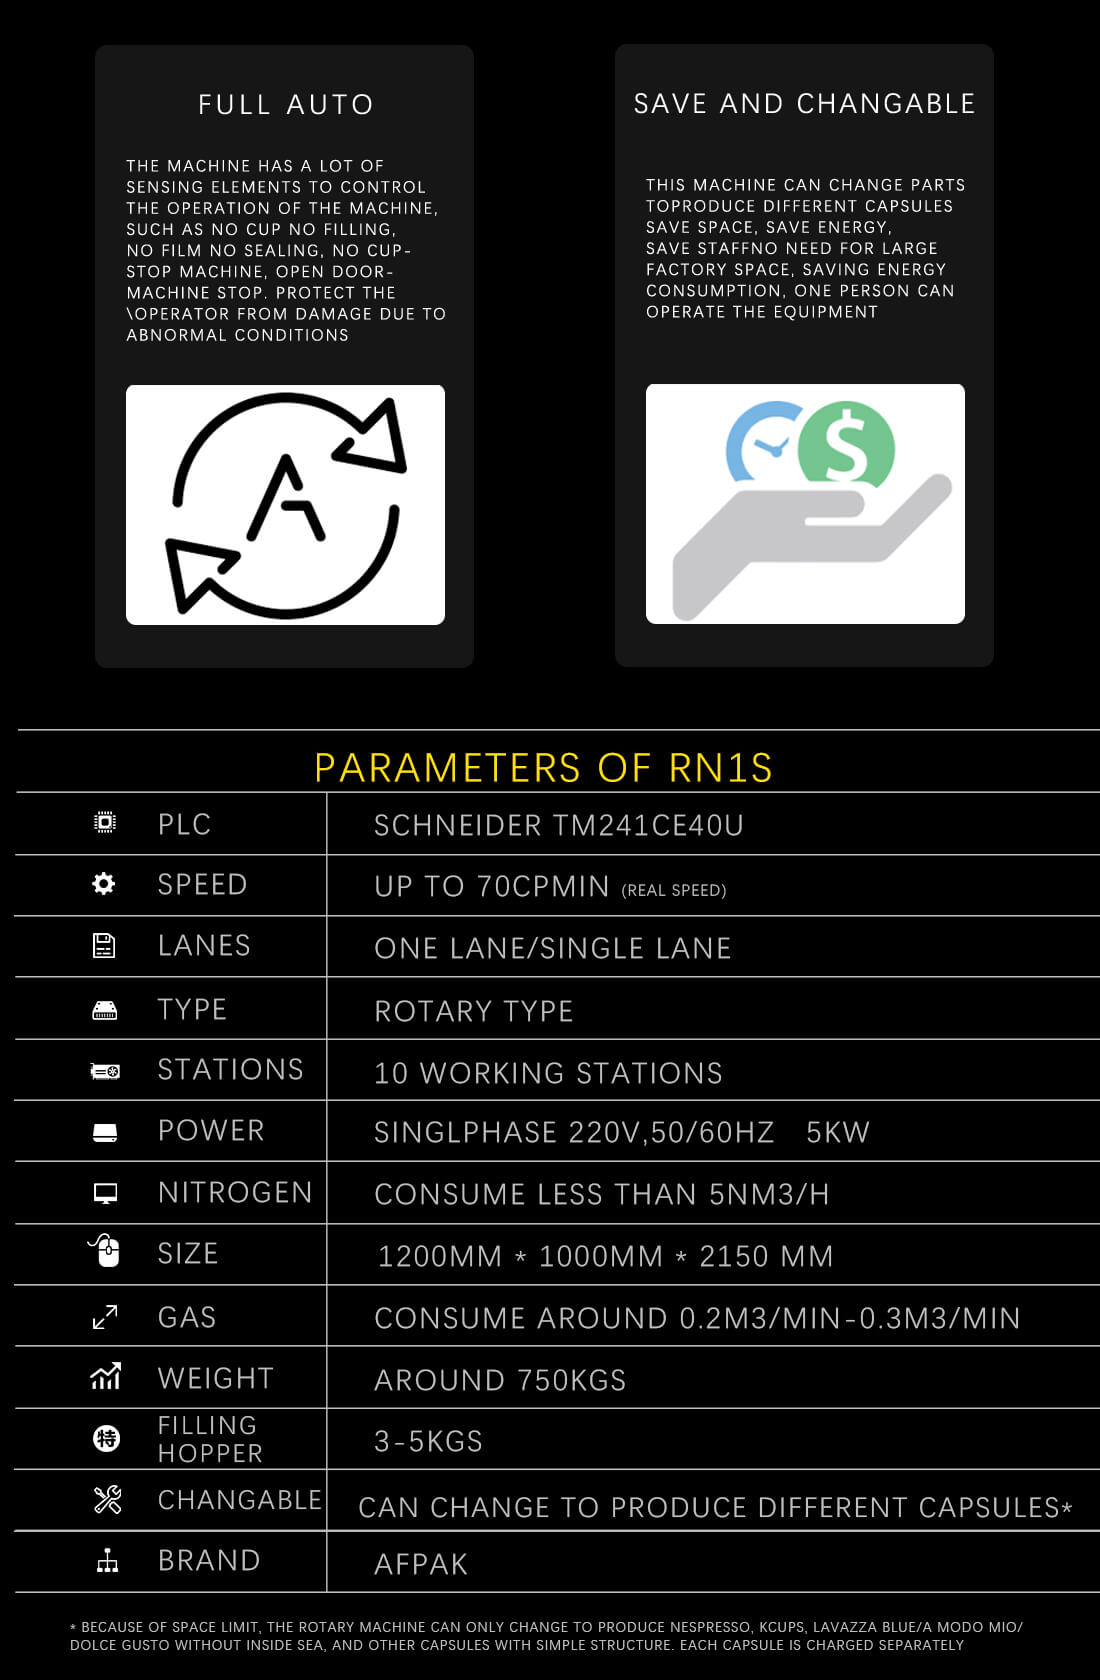
รูปที่ 1 - ข้อมูลจำเพาะ
2.2 สภาพแวดล้อมการดำเนินงาน
เครื่องนี้ได้รับการออกแบบมาให้ทำงานที่อุณหภูมิห้องในสภาพแวดล้อมภายในอาคาร
ตัวเครื่องมีล้อทำให้สามารถเคลื่อนย้ายบนพื้นผิวเรียบได้ โปรดถอดการเชื่อมต่อทั้งหมดออกและยึดสวิงอาร์มให้แน่นก่อนที่จะเคลื่อนย้าย
อุณหภูมิของอุปกรณ์ปิดผนึกความร้อนจะสูงมากเมื่อเครื่องทำงาน หากคุณจำเป็นต้องปรับเปลี่ยนเครื่องหรือดำเนินการบำรุงรักษาใดๆ ในบริเวณใกล้กับองค์ประกอบความร้อน ให้ปิดเครื่องและปล่อยให้เครื่องเย็นลงก่อน
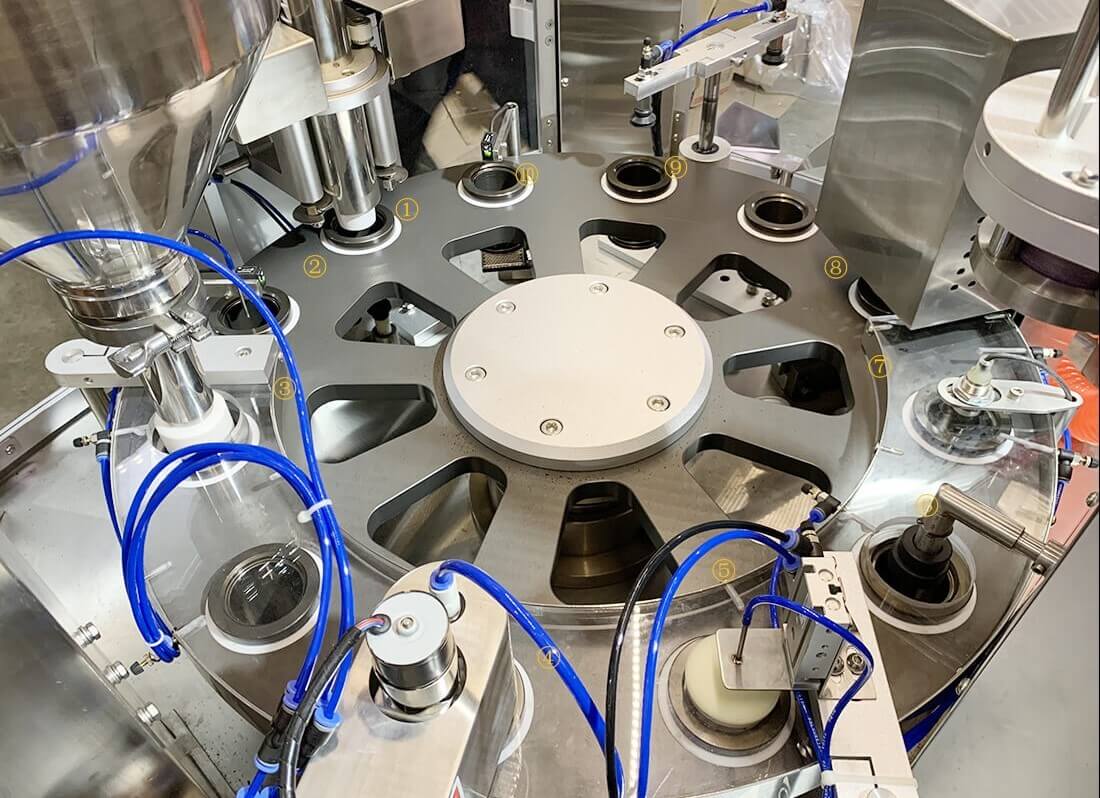
2.3 ภาพรวมเครื่อง
ก่อนติดตั้งเครื่อง โปรดอ่านคู่มือนี้อย่างละเอียด เพื่อหลีกเลี่ยงการบาดเจ็บและ/หรือความเสียหายต่อเครื่อง
โปรดทำความคุ้นเคยกับเครื่องจักร การเชื่อมต่อ ขั้นตอนการหยุดฉุกเฉินก่อนที่จะพยายามใช้งาน
- หยดแคปซูลแนวตั้ง
- เซ็นเซอร์รูปถ้วย หากที่วางแก้วว่างเปล่า เครื่องจะไม่เติมช่องนั้น
- เครื่องบรรจุกาแฟบดด้วยสว่านที่ควบคุมด้วยเซอร์โว
- การทำความสะอาดขอบ
- ท่อเติมไนโตรเจน (หลอดสีน้ำเงินในแผนภาพ)
- ตัดและวางฝากระดาษไว้
- เซ็นเซอร์ฝาปิด
- การปิดผนึกฝา
- เอาท์พุทแคปซูล
- เซ็นเซอร์แคปซูล โดยทั่วไปหากไม่ได้วางฝาอย่างถูกต้อง แขนยกจะไม่สามารถยกแคปซูลได้ เครื่องซีลบรรจุแคปซูลกาแฟจะหยุดทำงาน
2.4 รหัสผ่านเครื่อง
คำเตือน: ผู้ใช้ที่มีประสบการณ์เท่านั้นที่ควรเข้าสู่โหมดการเขียนโปรแกรม
2.5 ควบคุมเค้าโครงหน้าจอคอมพิวเตอร์และฟังก์ชันหลัก

ฟังก์ชั่นหลักทั้งหมดได้รับการควบคุมผ่านแผงควบคุม องค์ประกอบส่วนใหญ่จะได้รับการตั้งโปรแกรมไว้ล่วงหน้าจากโรงงาน โปรดอย่าเปลี่ยนการตั้งค่าก่อนที่จะบันทึกการตั้งค่าเริ่มต้นจากโรงงาน
- หน้าจอสัมผัสหลัก
- การดำเนินการด้วยตนเอง
- การทำงานอัตโนมัติ
- หยุด
- หยุดฉุกเฉิน
- ซีลความร้อนที่สอง
การควบคุมแต่ละฟังก์ชั่นนั้นค่อนข้างง่าย มี 2 โหมดการทำงาน อัตโนมัติและด้วยตนเอง ในกรณีส่วนใหญ่ เครื่องจะทำงานในโหมดอัตโนมัติ
กด อัตโนมัติ บนแผงควบคุม จากนั้นกด อัตโนมัติ ปุ่ม C – สตาร์ท
เครื่องจะทำงานอัตโนมัติทุกฟังก์ชั่น
ในกรณีที่คุณต้องการควบคุมฟังก์ชันเฉพาะ ให้ปล่อยให้เครื่องอยู่ในโหมด MANUAL เลือกฟังก์ชันที่ต้องการบนแผงควบคุม จากนั้นกดปุ่ม AUTO C – เพื่อเริ่มต้น[/vc_column_text][/vc_column][/vc_row][vc_row][vc_column][vc_column_text]
3 การติดตั้งและเตรียมการทำงานของเครื่องซีลบรรจุแคปซูลกาแฟ
ปฏิบัติตามขั้นตอนต่อไปนี้
3.1 กำลังไฟฟ้า – 240 โวลต์ 50 เฮิรตซ์
เชื่อมต่อสายไฟที่ให้มาเข้ากับเต้ารับ 240 V 50 Hz 10 AMP
หลังจากเชื่อมต่อสายไฟแล้ว เปิดเครื่องโดยใช้สวิตช์เปิด/ปิด
3.2 ตั้งอุณหภูมิ
อุณหภูมิสำหรับหน่วยซีลทั้งสองชุดถูกกำหนดโดยมิเตอร์ควบคุมสองตัวบนแผงควบคุม มิเตอร์ด้านบน (มิเตอร์ G) จะตั้งอุณหภูมิของเครื่องตัดและหน่วยซีลชุดแรก
มิเตอร์วัดค่าด้านล่าง (มิเตอร์ F) จะตั้งอุณหภูมิของหน่วยซีลตัวที่สอง
หากต้องการตั้งอุณหภูมิให้กดปุ่มขึ้น/ลงจนได้อุณหภูมิที่ต้องการ ค่านี้จะแสดงเป็นสีเขียว
เครื่องจะร้อนขึ้นและแสดงอุณหภูมิจริง เมื่อถึงอุณหภูมิจริงสำหรับเกจวัดอุณหภูมิทั้งสองเครื่องแล้ว คุณอาจเริ่มทำแคปซูลได้
3.3 เครื่องอัดอากาศ – เรกูเลเตอร์สีน้ำเงิน
เชื่อมต่ออากาศอัดเข้ากับทางเข้าต่อไปนี้โดยใช้การเชื่อมต่อที่ให้มาหรือขั้วต่อใหม่ตามต้องการ
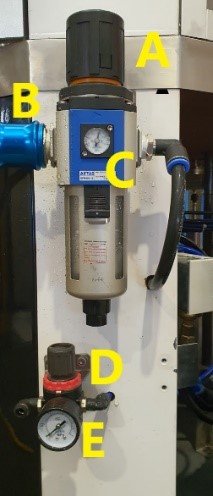
B - สวิตช์เปิด/ปิด กดเข้าเพื่อเปิดการจ่ายลม ดึงออกเพื่อเปิดการจ่ายลม
หากต้องการปรับความดันอากาศ ให้ดึง A ออกมาเพื่อส่งแรงดันอากาศไปยังหน่วยระหว่าง 0.6 bar-0.8 bar ตามที่แสดงในหน่วยเมตร C
หลังจากปรับแต่งแล้ว ให้กด C กลับลงมาที่ตำแหน่งล็อค
3.4 ไนโตรเจน-ตัวควบคุมสีแดง
กาแฟเป็นผลิตภัณฑ์ที่ละเอียดอ่อน เพื่อป้องกันการเกิดออกซิเดชันของกาแฟในแพ็คแบ่งส่วน มีการใช้ก๊าซไนโตรเจนในระหว่างการเติมจนกว่าแคปซูลจะถูกปิดผนึกและนำออกซิเจนออก
การล้างไนโตรเจนจะได้รับการจัดการโดยอัตโนมัติโดยเครื่องบรรจุแคปซูล ข้อกำหนดเพียงอย่างเดียวคือเชื่อมต่อขวดไนโตรเจนเกรดอาหารเข้ากับเครื่อง
หากต้องการปรับความดันอากาศ ให้ดึง D ออกมาเพื่อส่งแรงดันอากาศไปยังหน่วยระหว่าง 0.1 MPA ดังแสดงในหน่วยมิเตอร์ E
แรงดันก๊าซไนโตรเจนควรอยู่ที่ 0.1MPA โดยมีอัตราการไหลอยู่ระหว่าง 200-500 ลิตร/นาที
ใช้ไนโตรเจนเกรดอาหาร
3.5 โหลดแคปซูล
บรรจุแคปซูลเปล่าผ่านหลอดแคปซูล
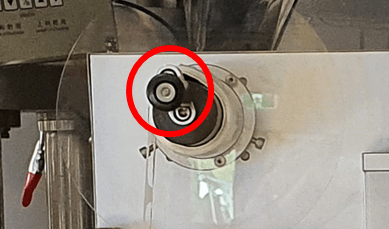
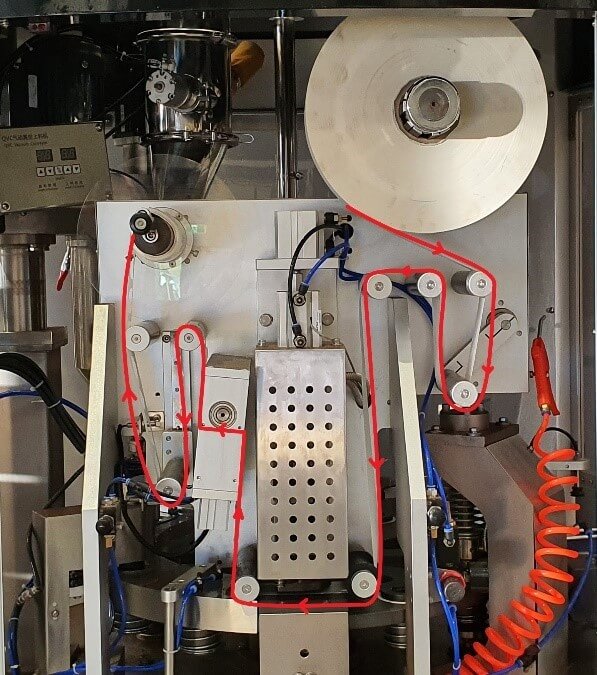
3.6 ใส่กระดาษจริง
ใส่กระดาษจริงโดยทำตามขั้นตอนด้านล่างนี้
3.7 การตั้งโปรแกรมขนาดยา
กำหนดน้ำหนักแคปซูลที่ต้องการ ในตัวอย่างนี้ เราจะเป็น 5.5 กรัม หากต้องการปรับเทียบน้ำหนักนี้ คุณจะต้องปรับค่าส่วนย่อยการให้อาหาร ยิ่งค่ามากขึ้น ปริมาณการบรรจุก็จะน้อยลง ค่าที่น้อยลง ปริมาณการบรรจุก็จะยิ่งมากขึ้น จุดเริ่มต้นที่ดีคือ 1.34
| การทำงาน | คำอธิบาย |
| การเติมเสิร์ฟ เปิด 100 ปิด 200 - นี่คือการควบคุมเวลาเปิดและปิดเซอร์โวการเติม | ไม่จำเป็นต้องปรับค่านี้ - ชุดโรงงาน |
| อุปกรณ์เติมเงิน เปิด Shut 300 – นี่คือเวลาการยกและลงของแคปซูล | ไม่จำเป็นต้องปรับค่านี้ - ชุดโรงงาน |
| เวลากวน 1.0 วินาที นี่คือเวลาหน่วงของรอบการกวนครั้งถัดไป เมื่อการกวนไม่ได้ตั้งค่าเป็นโหมดต่อเนื่อง | ไม่จำเป็นต้องปรับค่านี้ - ชุดโรงงาน |
| การทดสอบถ้วยถึงท็อปปิ้ง 0 - ไม่มีถ้วยไม่มีไส้ | ไม่จำเป็นต้องปรับค่านี้ - ชุดโรงงาน |
| น้ำหนักเพิ่ม 5.5 กรัม – คุณสามารถตั้งค่านี้เป็นน้ำหนักไส้ที่คุณต้องการได้ | ปรับค่านี้สำหรับน้ำหนักเอาต์พุตที่ต้องการ |
| Filling Serve เปิด 100 Shut 200 - ใช้เพื่อควบคุมเวลาเปิดและปิดเซอร์โวการเติมจากค่าโปรแกรมเมอร์ | ไม่จำเป็นต้องปรับค่านี้ - ชุดโรงงาน |
| ส่วนการป้อน: เป็นการปรับความแม่นยำในการบรรจุ หากน้ำหนักที่วัดได้ไม่ตรงตามค่าที่ตั้งไว้ (น้ำหนักเพิ่ม 5.5 กรัม) คุณสามารถปรับเทียบด้วยค่านี้ได้ ปรับการแบ่งส่วนการให้อาหาร: ยิ่งค่ามากขึ้น ปริมาณการบรรจุก็จะยิ่งน้อยลง ยิ่งค่าน้อย ปริมาณการบรรจุก็จะยิ่งมากขึ้น | ปรับค่านี้เพื่อปรับเทียบ จุดเริ่มต้นที่ดีคือ 1.34 |
| ความเร็วเซอร์โว ไม่จำเป็นต้องเปลี่ยนตามปกติ นี่คือความเร็วการทำงานของเซอร์โวมอเตอร์ | ไม่จำเป็นต้องปรับค่านี้ - ชุดโรงงาน |
| การเร่งความเร็วแบบเซอร์โว นี่คือการปรับการเร่งความเร็วของเซอร์โวมอเตอร์ ยิ่งค่าต่ำความเร็วก็จะยิ่งเร็วขึ้น | ไม่จำเป็นต้องปรับค่านี้ - ชุดโรงงาน |
| การชะลอตัวของเซอร์โว: ในการปรับการหยุดของเซอร์โวมอเตอร์ ค่าที่มากขึ้นจะใช้เวลาในการหยุดนานขึ้น | ไม่จำเป็นต้องปรับค่านี้ - ชุดโรงงาน |
| เซอร์โว. นี่คือความเร็วในการทำงานของเซอร์โวมอเตอร์ | ไม่จำเป็นต้องปรับค่านี้ - ชุดโรงงาน |
| เวลาเติมหลังจากวัสดุน้อยลง | ไม่จำเป็นต้องปรับค่านี้ - ชุดโรงงาน |
รูปที่ 8 - การตั้งโปรแกรมขนาดยา
3.8 การตั้งเคาน์เตอร์แคปซูลแบบถ้วย
คุณสามารถตั้งโปรแกรมเครื่องให้ตั้งค่าจำนวนแคปซูลที่กำหนดไว้ล่วงหน้าได้ เมื่อเครื่องถึงจำนวนแคปซูลที่ตั้งโปรแกรมไว้ เครื่องจะหยุดโดยอัตโนมัติและมีเสียงเตือน
การตั้งค่าปริมาณที่ตั้งโปรแกรมไว้:
เลือก การนับหยุด และกรอกจำนวนแคปซูลที่ต้องการ
เปิดใช้งาน ถ้วย
เครื่องจะหยุดทำงานอัตโนมัติหลังจากครบจำนวนถ้วยที่ตั้งโปรแกรมไว้
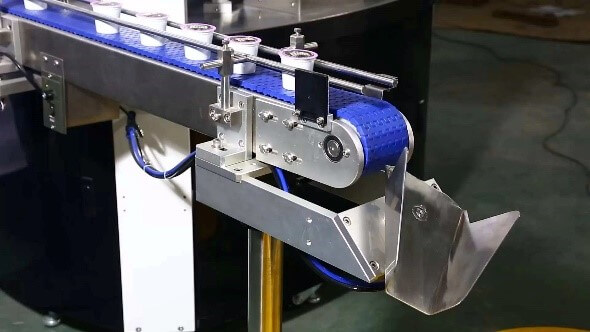
3.9 การนับจำนวนแคปซูลที่ปลายสายพานลำเลียง
คุณสามารถตั้งโปรแกรมให้เครื่องตั้งค่าแคปซูลตามจำนวนที่กำหนดไว้ล่วงหน้าที่ส่วนท้ายของสายพานลำเลียงก่อนที่รางจะเปลี่ยนตำแหน่ง
เมื่อเครื่องถึงจำนวนแคปซูลที่ตั้งโปรแกรมไว้ รางจะเปลี่ยนตำแหน่ง ช่วยให้สามารถนับแคปซูลต่อกล่องก่อนบรรจุได้
เพื่อกำหนดปริมาณที่ตั้งโปรแกรมไว้
4 ใส่กาแฟบด
4.1 เกี่ยวกับตัวโหลดกาแฟบด
เครื่องโหลดกาแฟบดจะโหลดสว่านพร้อมกาแฟบดโดยอัตโนมัติ
โปรดตรวจสอบการเชื่อมต่อก่อนใช้งาน
- แอร์ซัพพลาย
- การเชื่อมต่อสายไฟฟ้า
- หลอดสำหรับกาแฟบด

4.2 การขนถ่ายกาแฟบด
- ทำความสะอาดตัวกรอง
- เปลี่ยนเครื่องเป็น “อัตโนมัติ”
- กดปุ่มเปิด/ปิดบนกล่องป้อนสุญญากาศเพื่อให้ตัวป้อนสุญญากาศเปิดอยู่ หมายเหตุ: จะต้องดำเนินการนี้ทุกครั้งที่เปิดเครื่อง ฟิลเลอร์จะทำงานโดยอัตโนมัติเมื่อถังต้องการการเติม
- หลังจากเลี้ยวแล้ว บน ตัวป้อนจะมีเซ็นเซอร์อยู่บนถังบรรจุเพื่อตรวจสอบและควบคุมตัวป้อนสุญญากาศ/สายพานลำเลียง

4.3 การเทถังกาแฟบดออก
กรุณาอย่าทิ้งกาแฟบดไว้ในถัง ควรบรรจุในแคปซูลหรือนำออกเมื่อคุณบรรจุเสร็จแล้วสำหรับวันนั้น
หากต้องการล้างฮอปเปอร์และสว่าน โปรดปฏิบัติตามคำแนะนำด้านล่าง
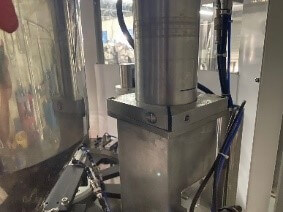
- คลายสกรูด้านล่างสว่าน
- บนแผงควบคุม สลับไปที่ คู่มือ
- เลือก การกรอก และ คน บนหน้าจอสัมผัส
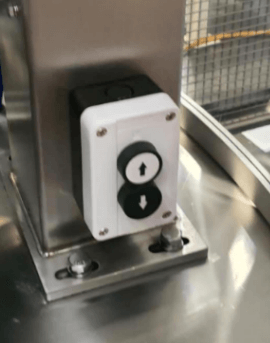
- ใช้ปุ่มเพื่อยกสว่าน แกว่งออก และเทกาแฟออก
- เมื่อคุณจัดแนวฮอปเปอร์ให้ห่างจากเครื่องและมีภาชนะอยู่ใต้พวยกาแล้ว
- ปิดเครื่อง การกรอก
- ใช้งานอยู่ ถังเปล่า และ คน
- เมื่อ AUGUR ว่างเปล่า – ปิด ถังเปล่า และ คน
- เพื่อย้อนกลับกระบวนการและทำให้เครื่องกลับสู่โหมดการทำงานปกติ
- ใช้ปุ่มเพื่อเลื่อน Augur ลง
- ขันสกรูให้แน่นเพื่อล็อคเข้าที่
5 การใช้งานเครื่อง
5.1 การเลือกภาษา
รูปที่ 15 - การเลือกภาษา
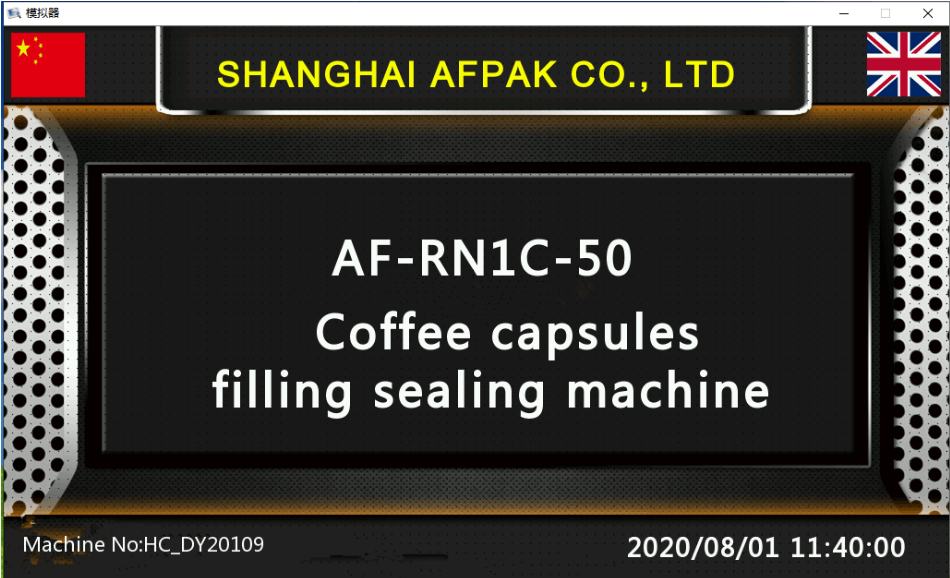
กด (กดค้างไว้ 3 วินาที) ธงชาติจีน เปลี่ยนภาษาจีนบนแผงควบคุม
กด (กดค้างไว้ 3 วินาที) ธงชาติสหราชอาณาจักร จากนั้นเปลี่ยนเป็นภาษาอังกฤษบนแผงควบคุม
5.2 การใช้งานเครื่องในโหมดอัตโนมัติ
โดยปกติเครื่องจะทำงานในโหมด AUTOMATIC โดยที่ผู้ปฏิบัติงานไม่จำเป็นต้องปรับพารามิเตอร์ใดๆ
- สิ่งสำคัญคือต้องล้างเครื่องออกจากแคปซูลทั้งหมดก่อนเริ่มเครื่อง
- เปิดเครื่องและรอจนกระทั่งอุณหภูมิถึงอุณหภูมิที่แผงควบคุมด้านหน้า
- ตรวจสอบให้แน่ใจว่าแรงดันลมถูกต้อง
- เปิดการฉีดไนโตรเจน
- เปิดเครื่องป้อนสุญญากาศ
- โหลดกาแฟบด
- ใส่แคปซูลเปล่าลงในถังบรรจุแคปซูล
- ใส่เครื่องลงไป โหมดอัตโนมัติ
- กดปุ่มสีเขียว ‘C’ AUTOMATIC บนแผงควบคุม
- กดปุ่มสีแดง 'D' เพื่อหยุดเครื่องเมื่อใดก็ได้
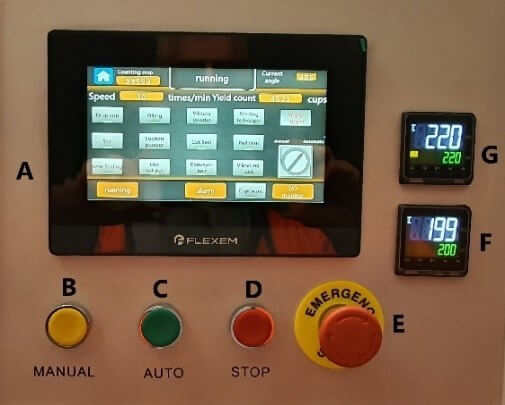
รูปภาพ 16 - ปุ่มควบคุมบนแผงควบคุม
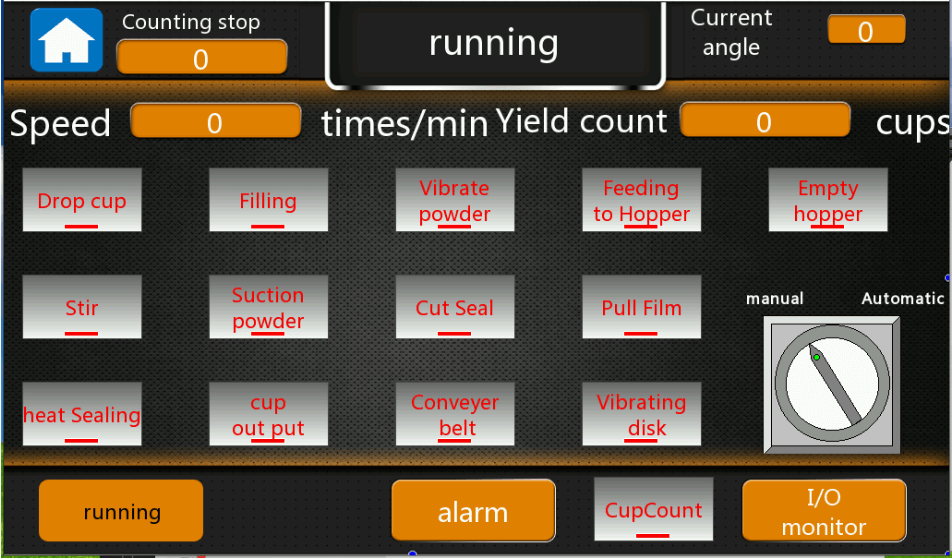
รูปที่ 17 - สรุปเครื่องหลัก
5.3 ฟังก์ชั่นการทำงานด้วยตนเอง
สามารถใช้งานแต่ละองค์ประกอบหรือหลายองค์ประกอบด้วยตนเองเพื่อวัตถุประสงค์ในการทดสอบหรือทำความสะอาด
เลือกฟังก์ชันจากแผงควบคุม
- ตัวอย่าง เลือกสายพานลำเลียง
- กดปุ่มสีเขียว 'C' อัตโนมัติบนแผงควบคุมเพื่อเริ่มต้น
- กดปุ่ม 'D' สีแดงเพื่อหยุดเครื่องได้ตลอดเวลา
- ตัวอย่าง เลือก ดึงฟิล์ม
- กดปุ่มสีเขียว 'C' อัตโนมัติบนแผงควบคุมเพื่อเริ่มต้น
- กดปุ่ม 'D' สีแดงเพื่อหยุดเครื่องได้ตลอดเวลา
6 โหมดการเขียนโปรแกรม
6.1 สรุปเครื่องจักร
นี่คือหน้าสำหรับเข้าสู่การตั้งค่าพารามิเตอร์ ห้ามทำการเปลี่ยนแปลงใดๆ โดยไม่ปฏิบัติตามข้อกำหนดของผู้ผลิต รหัสผ่านคือ 198888.
6.2 หน้าการทำงานอัตโนมัติ
นี่คือหน้าสำหรับเข้าสู่การตั้งค่าพารามิเตอร์ ห้ามทำการเปลี่ยนแปลงใดๆ โดยไม่ปฏิบัติตามข้อกำหนดของผู้ผลิต รหัสผ่านคือ 198888.
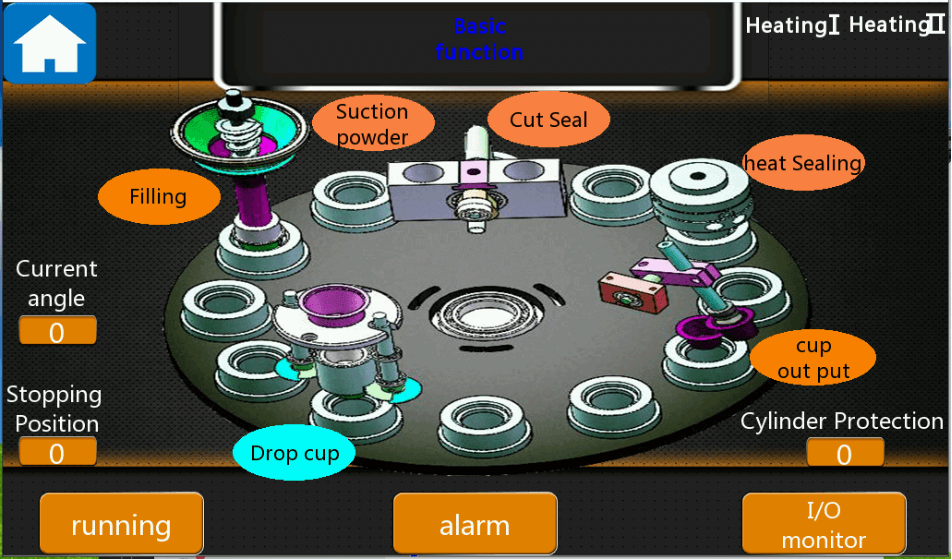
รูปที่ 18 - สรุปเครื่อง
แผนภูมิสรุปเครื่องแสดงองค์ประกอบการทำงานหลักของเครื่อง เมื่อเครื่องเข้าแล้ว โหมดแมนนวลการเลือกฟังก์ชันหลักรายการใดรายการหนึ่งจะนำคุณไปยังฟังก์ชันการเขียนโปรแกรมสำหรับส่วนนั้นของกระบวนการ
ฟังก์ชั่นการเขียนโปรแกรมที่สำคัญ:
- ดรอปคัพ
- การกรอก
- ผงดูด
- ตัดซีล
- การปิดผนึกด้วยความร้อน
- คัพเอาท์พุต - ตั้งค่าพารามิเตอร์เพื่อป้องกันกระบอกสูบเมื่อเครื่องจักรหยุดทำงาน
- เครื่องทำความร้อน - คือการเปิดเครื่องทำความร้อนหมายเลข 5 และหมายเลข 6 กดเพื่อเปิด/ปิด
- มุมปัจจุบัน: ตำแหน่งจานหมุนตอนนี้ขณะทำงาน (ตั้งค่าในโปรแกรมเมอร์เครื่องจักร)
- ตำแหน่งหยุด: เวลาทำงานของจานหมุน (ตั้งค่าในโปรแกรมเมอร์เครื่องจักร)
- หน้าแรก: กดเพื่อกลับหน้าแรก
- ตัดสั้นไปที่หน้าจอวิ่ง
- ทางลัดไปยังหน้าจอการเตือน
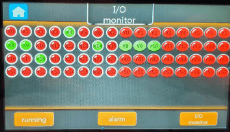
- ทางลัดไปยังหน้าจอมอนิเตอร์ I/O
6.3 การวิ่ง
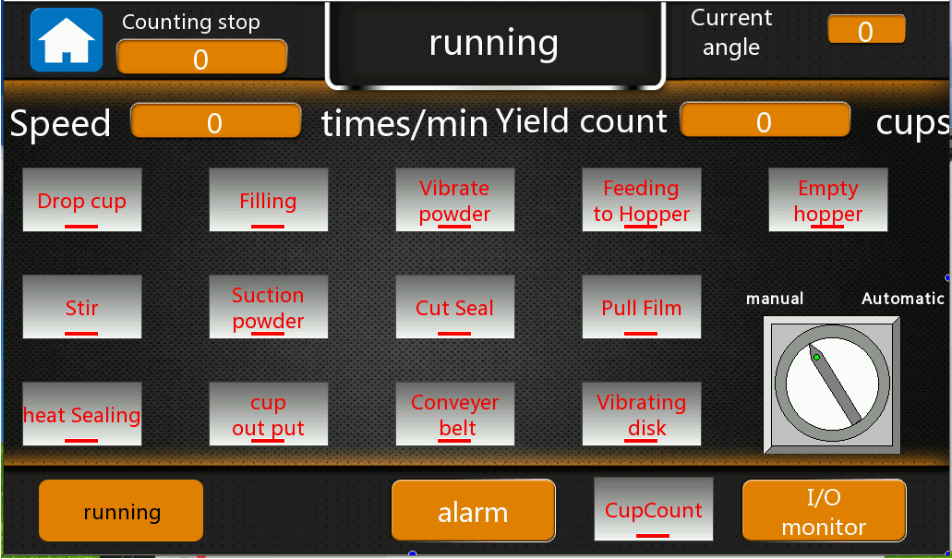
รูปที่ 19 - หน้าจอการทำงานหลัก
นี่คือหน้าจอหลักที่ใช้ควบคุมเครื่อง วางเครื่องในโหมดอัตโนมัติ จากนั้นกดปุ่ม C (ปุ่มสีเขียว) เพื่อเดินเครื่อง อ้างอิง 8 การใช้งานเครื่อง
- วางถ้วย: เพื่อควบคุมถ้วยหล่น
- การเติม: เพื่อควบคุมสถานีเติม
- ผงสั่น: เพื่อควบคุมการสั่นสะเทือนของไส้
- การป้อนไปยังถัง: เพื่อควบคุมเครื่องป้อนสุญญากาศ
- Empty Hopper: ฟังก์ชั่นทำความสะอาดฮอปเปอร์
- คน: เพื่อควบคุมมอเตอร์คนคน
- ผงดูด: เพื่อควบคุมสถานีทำความสะอาดขอบแคปซูล
- ซีลตัด: เพื่อควบคุมสถานีตัดและซีล
- ดึงฟิล์ม: เพื่อควบคุมมอเตอร์ดึงฟิล์ม
- การปิดผนึกด้วยความร้อน: เพื่อควบคุมสถานีปิดผนึกที่สอง
- คัพเอาท์พุต: เพื่อควบคุมเอาท์พุตคัพ
- สายพานลำเลียง: ควบคุมการทำงานของสายพาน
- แผ่นสั่น: เพื่อควบคุมระบบป้อนแคปซูลแบบสั่น (ฟังก์ชั่นเสริม
- Cup count: เพื่อควบคุมฟังก์ชั่นการนับถ้วย
- แมนนวล/อัตโนมัติ: หากโหมดแมนนวล ฟังก์ชั่นทั้งหมดไม่ทำงาน คุณต้องกดอันที่คุณต้องการใช้งาน จากนั้นกดปุ่มสีเขียวใต้หน้าจอเพื่อทดสอบฟังก์ชั่นนี้ หากเป็นโหมดอัตโนมัติฟังก์ชั่นทั้งหมดจะทำงาน
6.4 ดรอปคัพ
หน้าจอการตั้งโปรแกรมดรอปคัพจะถูกป้อนโดยการสัมผัส ถ้วยหล่น เกี่ยวกับเรื่องย่อ
การดำเนินการด้วยตนเอง ได้แก่ :
- ดรอปคัพ. กดเพื่อเรียกใช้ฟังก์ชันนี้ในโมดูล Manual เพียงกดปุ่ม จากนั้นฟังก์ชันก็จะทำงาน ในโมดูลอัตโนมัติ ฟังก์ชันทั้งหมดจะทำงาน
ฟังก์ชั่นการเขียนโปรแกรม
- Yield count: เพื่อนับจำนวนแคปซูลที่ผลิตได้
- ความเร็ว: ความเร็วการทำงานของเครื่อง
- แบบแมนนวล/อัตโนมัติ: สลับไปที่การทำงานอัตโนมัติหรือการทำงานแบบแมนนวลของเครื่อง
- กระบอกดร็อปคัพ: ตั้งค่าพารามิเตอร์เพื่อควบคุมกระบอกดร็อปคัพเมื่อใดจะทำงานและหยุด
- ถ้วยเลื่อนขึ้น/ลง: ตั้งค่าพารามิเตอร์เพื่อควบคุมกระบอกถ้วยขึ้น/ลงเมื่อใดจะทำงานและหยุด
- สูญญากาศแบบถ้วยหยด: ตั้งค่าพารามิเตอร์เพื่อควบคุมการดูดสูญญากาศแบบถ้วยหยดเมื่อใดจะทำงานและหยุด
- การทดสอบถ้วย: คือพารามิเตอร์เซ็นเซอร์ที่จะตรวจจับเมื่อต้องทำงาน/หยุด
- จำนวนถ้วยลดลงหลังจากไม่มีถ้วย: ตั้งค่าเป็นค่าเพื่อหยุดเครื่องหลังจากไม่มีแคปซูลในจานหมุนกี่แคปซูล
- คำแนะนำ: เป็นสัญญาณการทำงานของฟังก์ชัน
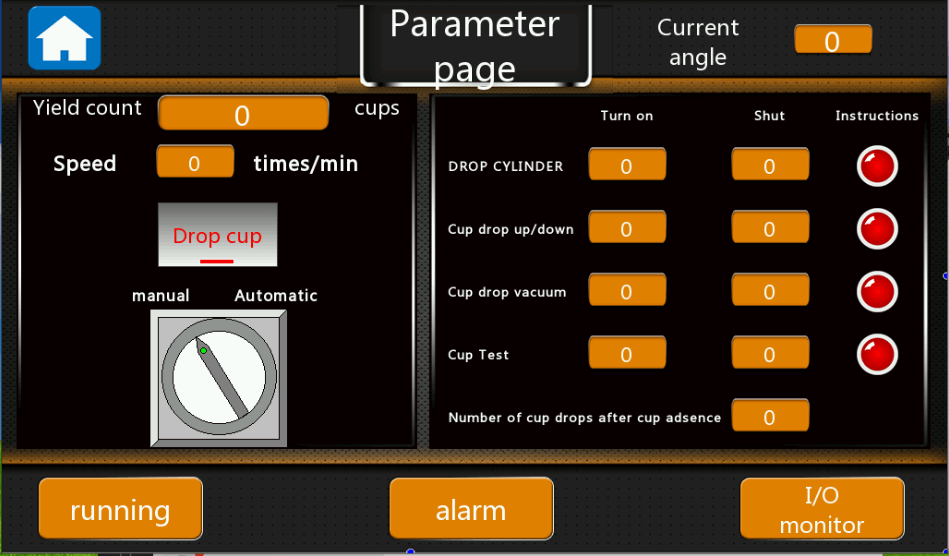
รูปที่ 20 - หน้าพารามิเตอร์ดรอปคัพ
6.5 การเติม
เข้าสู่เมนูการโปรแกรมการเติมโดยเลือกตัวบ่งชี้การเติมบนบทสรุป เมนูการตั้งโปรแกรมนี้จะช่วยให้คุณสามารถปรับค่าการเติมกาแฟบดที่สำคัญสำหรับเครื่องได้ คุณควรจำกัดการเปลี่ยนแปลงใดๆ ในหน้าจอการตั้งโปรแกรมนี้ เนื่องจากค่าส่วนใหญ่เป็นการตั้งค่าจากโรงงาน
โดยปกติคุณจะต้องปรับเท่านั้น เพิ่มน้ำหนักแล้ว สนาม.
การสอบเทียบทำได้ผ่านทาง แผนกการให้อาหาร สนาม.
- การเติมเซอร์โว
- อุปกรณ์ท็อปปิ้ง.
- เวลากวน.
- การทดสอบคัพเพื่อเติมท็อปปิ้ง
- น้ำหนักเพิ่ม 5.5 กรัม – คุณสามารถตั้งค่านี้เป็นน้ำหนักการบรรจุที่คุณต้องการได้
- เสิร์ฟไส้.
- แผนกการให้อาหาร. นี่เป็นการปรับความแม่นยำในการบรรจุหากน้ำหนักที่วัดได้ไม่ตรงตามค่าที่ตั้งไว้ (น้ำหนักเพิ่ม 5.5 กรัม) คุณสามารถปรับเทียบด้วยค่านี้ได้
- ความเร็วเซอร์โว
- การเร่งความเร็วแบบเซอร์โว นี่คือการปรับการเร่งความเร็วของเซอร์โวมอเตอร์ ยิ่งค่าต่ำความเร็วก็จะยิ่งเร็วขึ้น
- การชะลอตัวของเซอร์โว หากต้องการปรับการหยุดเซอร์โวมอเตอร์ ค่าที่มากขึ้นจะใช้เวลาในการหยุดนานขึ้น
- เวลาเติมหลังจากวัสดุน้อยลง
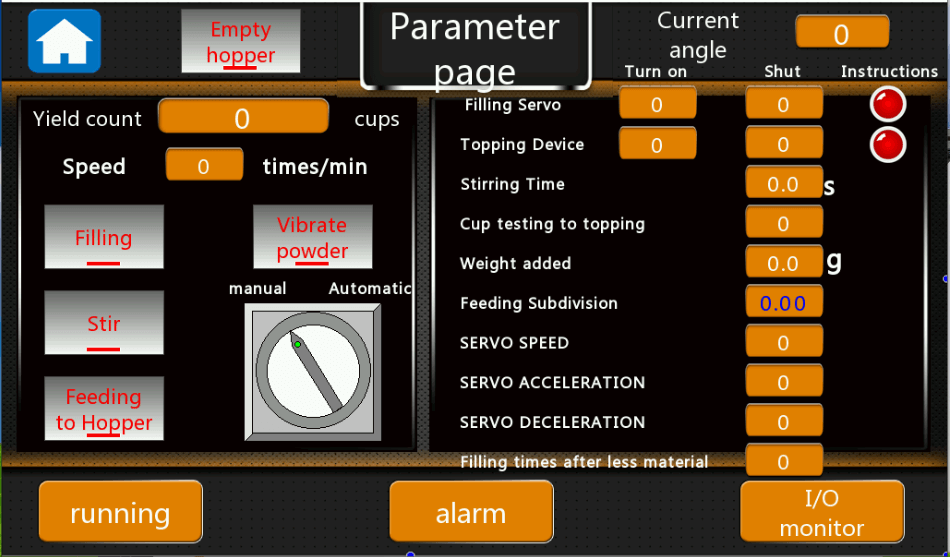
รูปที่ 21 - หน้าพารามิเตอร์การเติมแคปซูล
6.6 ผงสั่นสะเทือน
- ผงดูด: เพื่อทำความสะอาดผงที่ขอบแคปซูลเพื่อการซีลที่ดีขึ้น
- คู่มือ/อัตโนมัติ: ในโมดูล Manual เพียงกดปุ่มจากนั้นฟังก์ชันจะทำงาน ในโมดูลอัตโนมัติ ฟังก์ชั่นทั้งหมดจะทำงาน
- กระบอกสูบแทมป์: เพื่อควบคุมว่าแทมป์กระบอกจะทำงาน/หยุดเมื่อใด
- การดูดสูญญากาศ: เพื่อควบคุมว่าการดูดสุญญากาศจะทำงาน/หยุดเมื่อใด
- ตรวจพบผงดูด: เพื่อกำหนดจำนวนสถานีระหว่างเซ็นเซอร์ตรวจจับถ้วยกับสถานีดูดผง
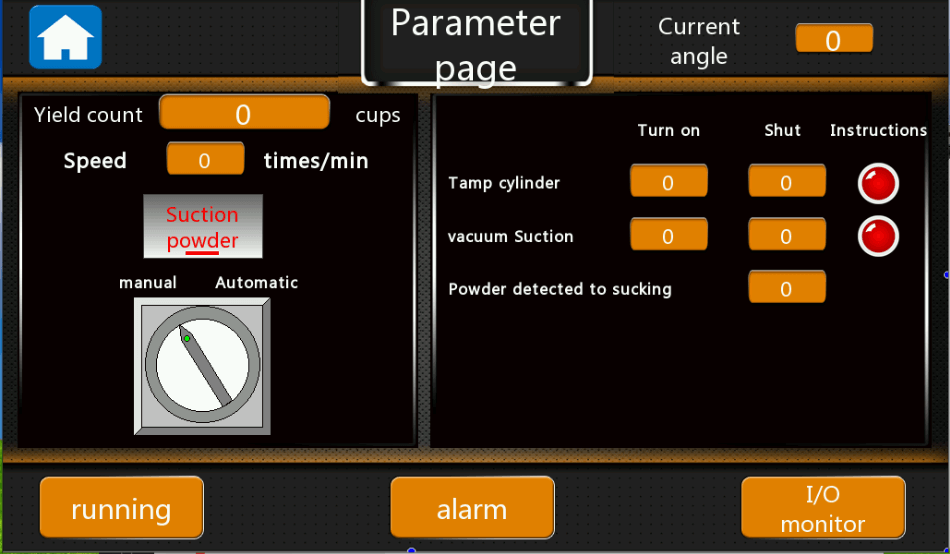
รูปภาพ 22 - หน้าพารามิเตอร์สำหรับผงดูด
6.7 ซีลตัด
ป้อน ตัดซีล เมนูการเขียนโปรแกรมโดยเลือก ตัดซีล ตัวบ่งชี้ในบทสรุป เมนูการตั้งโปรแกรมนี้จะช่วยให้คุณสามารถปรับพารามิเตอร์ที่แท้จริงของฟิล์มสำหรับเครื่องได้ คุณควรจำกัดการเปลี่ยนแปลงใดๆ ในหน้าจอการตั้งโปรแกรมนี้ เนื่องจากค่าส่วนใหญ่เป็นการตั้งค่าจากโรงงาน
- ตัดซีล: เพื่อควบคุมการตัดและซีลกระบอก
- ใส่ฟิล์ม: เพื่อควบคุมกระบอกดึงฟิล์ม
- คู่มือ/อัตโนมัติ: ในโมดูล Manual เพียงกดปุ่มจากนั้นฟังก์ชันจะทำงาน ในโมดูลอัตโนมัติ ฟังก์ชั่นทั้งหมดจะทำงาน
- เครื่องหมายวรรคตอนด้วยตนเอง: สำหรับฟิล์มที่มีเครื่องหมายตา ให้กดปุ่มนี้ จากนั้นฟิล์มจะทำงานอัตโนมัติและหยุดที่เครื่องหมายตาที่เซ็นเซอร์ตรวจพบ
- การสอบเทียบ: คือการควบคุมเครื่องให้ดึงฟิล์มตามความยาวที่กำหนด.
- กระบอกตัด: เพื่อควบคุมเมื่อกระบอกตัดทำงาน/หยุด
- ซีลความร้อนตัดฟิล์ม: เพื่อควบคุมเมื่อซีลความร้อนทำงาน/หยุด
- เซอร์โวการวาดภาพภาพยนตร์: เพื่อควบคุมเมื่อเซอร์โวดึงฟิล์มทำงาน/หยุด
- การทดสอบคัพเพื่อตัดเมมเบรน: เพื่อกำหนดจำนวนสถานีระหว่างเซ็นเซอร์ตรวจจับถ้วยกับสถานีตัดฟิล์ม
- การทดสอบคัพเพื่อดึงฟิล์ม: เพื่อกำหนดจำนวนสถานีระหว่างเซ็นเซอร์ตรวจจับถ้วย ถึง สถานีดึงหนัง.
- ดึงความเร็ว: เพื่อควบคุมความเร็วการดึงฟิล์ม
- การเร่งฟิล์ม: เพื่อควบคุมเซอร์โวมอเตอร์เมื่อต้องเร่งความเร็วเพื่อดึงฟิล์มให้มากขึ้น
- การชะลอความเร็วของฟิล์ม: เพื่อควบคุมเซอร์โวมอเตอร์เมื่อจะชะลอความเร็วเพื่อดึงฟิล์มอย่างช้าๆ
- ความยาวภาพยนตร์ I: เพื่อกำหนดขั้นตอนแรกในการดึงจำนวนฟิล์มที่ดึงในคราวเดียว
- ความยาวฟิล์ม II: เพื่อกำหนดขั้นตอนที่ 2 เพื่อดึงจำนวนภาพยนตร์ในคราวเดียว
- การชดเชยฟิล์มดึง: เพื่อปรับความแม่นยำของฟิล์มดึง
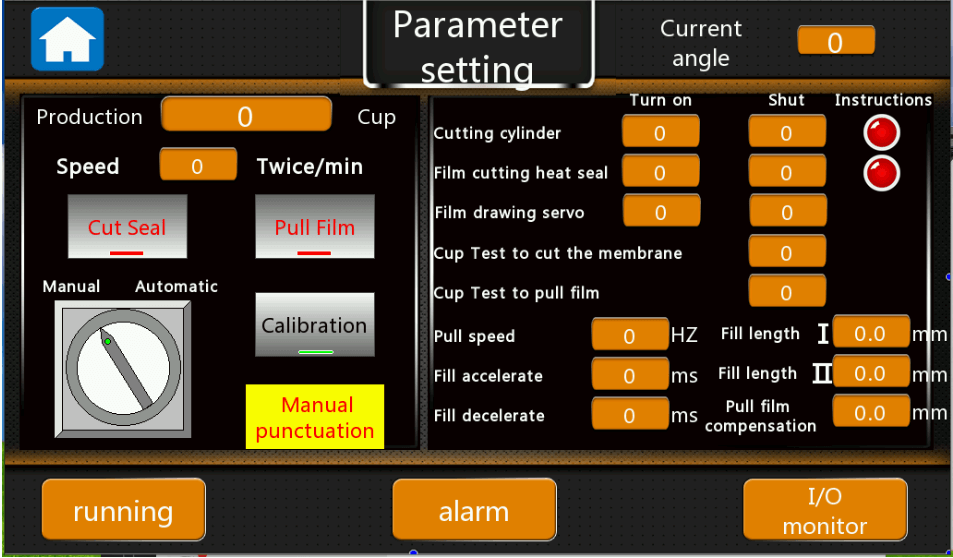
รูปที่ 23 - หน้าพารามิเตอร์สำหรับการซีลและตัดฟิล์ม
6.8 การปิดผนึกด้วยความร้อน
ป้อน การปิดผนึกด้วยความร้อน เมนูการเขียนโปรแกรมโดยเลือก การปิดผนึกด้วยความร้อน ตัวบ่งชี้ในบทสรุป เมนูการตั้งโปรแกรมนี้จะช่วยให้คุณสามารถปรับการกำหนดเวลาเชิงกลขึ้นลงที่เกี่ยวข้องกับเครื่องซีลความร้อนได้ คุณควรจำกัดการเปลี่ยนแปลงใดๆ ในหน้าจอการตั้งโปรแกรมนี้ เนื่องจากค่าส่วนใหญ่เป็นการตั้งค่าจากโรงงาน
- การปิดผนึกด้วยความร้อน: สำหรับสถานีปิดผนึกที่สองทำงาน
- ซีลความร้อนขึ้น/ลง: เพื่อควบคุมเวลาที่กระบอกสูบขึ้น/ลงทำงาน
- ตรวจพบถ้วยเพื่อปิดผนึกความร้อน: เพื่อกำหนดจำนวนสถานีระหว่างเซ็นเซอร์ตัวตรวจจับถ้วยกับสถานีปิดผนึกที่สอง
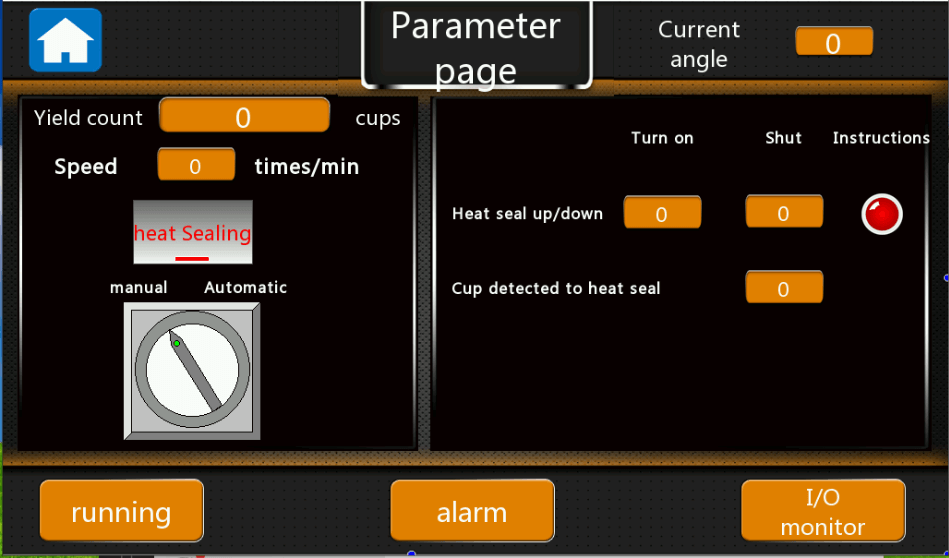
รูปภาพ 24 - การตั้งค่าพารามิเตอร์สำหรับการปิดผนึกด้วยความร้อน
6.9 คัพเอาท์พุต
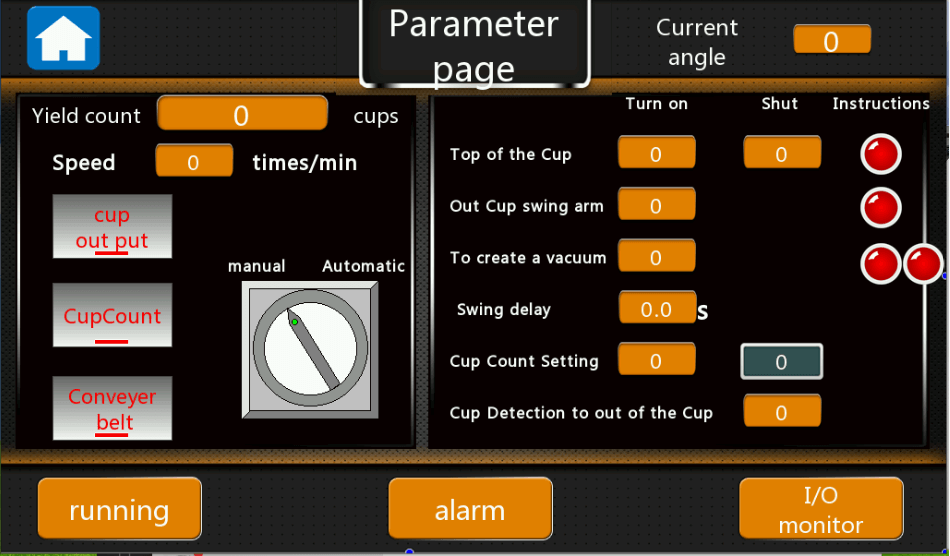
ป้อน คัพเอาท์พุต เมนูการเขียนโปรแกรมโดยเลือก คัพเอาท์พุต ตัวบ่งชี้ในบทสรุป
เมนูการตั้งโปรแกรมนี้จะช่วยให้คุณสามารถปรับแขนกลที่เกี่ยวข้องกับเอาท์พุตของคัพได้ คุณควรจำกัดการเปลี่ยนแปลงใดๆ ในหน้าจอการตั้งโปรแกรมนี้ เนื่องจากค่าส่วนใหญ่เป็นการตั้งค่าจากโรงงาน
- คัพเอาท์พุต: เพื่อควบคุมเอาท์พุตของถ้วย
- จำนวนถ้วย: เพื่อตรวจจับจำนวนถ้วยที่ออกมาแล้วพลิกกลับ
- สายพานลำเลียง: เพื่อควบคุมสายพานลำเลียง
- ด้านบนของถ้วย: เพื่อควบคุมการทำงานของถ้วยขึ้น/ลง/หยุด
- สวิงอาร์มเอาท์คัพ: เพื่อควบคุมเวลาทำงาน/หยุดสวิงอาร์ม
- วิธีสร้างสุญญากาศ: เพื่อควบคุมว่าเครื่องดูดฝุ่นแบบถ้วยจะทำงานเมื่อใด
- ความล่าช้าในการสวิง: เพื่อควบคุมเวลาหน่วงระหว่างการทำงานสองครั้ง
- การตั้งค่าการนับถ้วย: เพื่อกำหนดจำนวนถ้วยแล้วจึงแกว่งไปอีกด้านหนึ่ง.
- การตรวจจับถ้วยเมื่อออกจากถ้วย: เพื่อกำหนดจำนวนสถานีระหว่างเซ็นเซอร์ตัวตรวจจับถ้วยกับสถานีเอาต์พุตของถ้วย
6.10 ภาพรวมของสัญญาณเตือน
รูปภาพ 26 - หน้าจอสัญญาณเตือน

รูปที่ 26 - หน้าจอแจ้งเตือนของเครื่องซีลบรรจุแคปซูลกาแฟ AFPAK หยุดฉุกเฉิน: ขณะนี้เครื่องอยู่ภายใต้การหยุดฉุกเฉิน โปรดหมุนปุ่มหยุดฉุกเฉินแล้วกดปุ่มสีแดงด้านล่างหน้าจอสัมผัสเพื่อล้างการเตือน
- โปรดป้อนไซโลไม่เพียงพอ: ผงในถังบรรจุไม่เพียงพอ โปรดป้อนเพิ่ม
- สัญญาณเตือนการขาดแคลนถัง: ถังขาดแคลน โปรดป้อนเพิ่ม
- ความล้มเหลวของเมนเฟรม: ความล้มเหลวของความถี่ตัวแปรที่เกิดจากความไม่เสถียรของแรงดันไฟฟ้า ยืนยันแรงดันไฟฟ้าขาเข้าเพื่อให้มั่นใจถึงเสถียรภาพของแรงดันไฟฟ้า
- การป้องกันกระบอกสูบเอาท์พุตของคัพ: มีบางอย่างผิดปกติกับกระบอกสูบเอาท์พุตของคัพ โปรดตรวจสอบ
- หยุดการนับ: เครื่องจักรที่ผลิตได้ตามปริมาณที่ตั้งไว้บนหน้าจอ โปรดรีเซ็ตค่าการนับ
- ตำแหน่งโฮสต์ค้าง: ตำแหน่งโฮสต์ค้าง โปรดตรวจสอบมอเตอร์หลัก
- การป้องกันกระบอกดรอปคัพ: กระบอกดรอปคัพขึ้น/ลงติดอยู่
- การปิดระบบฟิล์มเปล่า: ฟิล์มขาดตลาด โปรดจัดหาเพิ่ม
- การป้องกันแรงดันอากาศต่ำ: ความดันอากาศของเครื่องน้อยกว่า 0.6MPA โปรดป้อนอากาศให้มากขึ้น
- ถังแบบถ้วยที่ไม่มีการปิดถ้วย: โปรดป้อนแคปซูลเพิ่มลงในถังแคปซูล
- ความล้มเหลวของเซอร์โวในการตัดฟิล์ม: โปรดตรวจสอบรหัสข้อผิดพลาดของไดรเวอร์เซอร์โวมอเตอร์
- ระบบป้องกันประตูนิรภัย: ประตูเปิดอยู่ เครื่องจะไม่ทำงาน
- การหยุดแบบมีวัตถุ: แผ่นหมุนติดอยู่กับบางสิ่งบางอย่าง โปรดตรวจสอบ
- ฟิล์มกันรอย : ฟิล์มแตก
- เติมเซอร์โวล้มเหลว 1 ตัว: การเติมเซอร์โวมอเตอร์ไม่ทำงาน
- การป้องกันแบบลามิเนต: มีบางอย่างผิดปกติกับกระบอกฟิล์มดัน
- การป้องกันซีลความร้อนด้วยฟิล์มตัด: สิ่งผิดปกติกับสถานีตัดและซีล
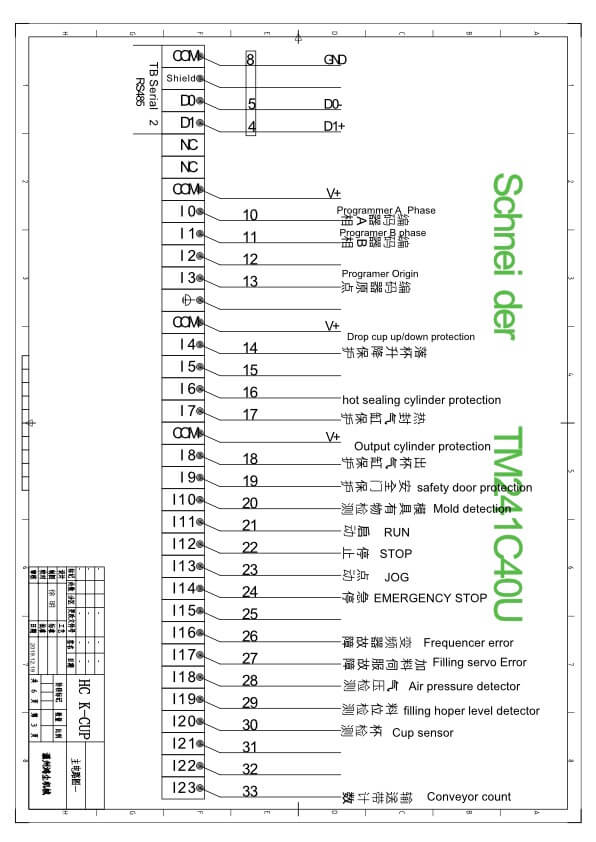
- เมื่อมีสัญญาณเตือน โปรดตรวจสอบตำแหน่งให้ชัดเจน แก้ไขข้อผิดพลาด จากนั้นกดปุ่ม "หยุด" สีแดงด้านล่างหน้าจอ จากนั้นเครื่องจะทำงานอีกครั้ง
6.11 มอนิเตอร์อินพุต/เอาท์พุต
7 รหัสผ่าน
นี่คือหน้าสำหรับเข้าสู่การตั้งค่าพารามิเตอร์ ห้ามทำการเปลี่ยนแปลงใดๆ โดยไม่ปฏิบัติตามข้อกำหนดของผู้ผลิต รหัสผ่านคือ 198888.
8 ข้อมูลติดต่อที่สำคัญ
เจฟฟรี เฉา
เซี่ยงไฮ้ อาฟพัค บจก
เว็บไซต์: www.afpakmachine.com
วอทส์แอพ: +86-15618866167
Skype: allenanf
อีเมล: anf717@gmail.com info@anfpak.com
9 ข้อกำหนดด้านกฎระเบียบ
[ป้อนข้อมูลที่อธิบายข้อกำหนดการปฏิบัติตามกฎระเบียบและนโยบาย หรือระบุตำแหน่งที่จัดเก็บ]
10 เครื่องปิดผนึกบรรจุแคปซูลกาแฟ ปัญหาทั่วไปและการแก้ไขปัญหา
ในกระบวนการทำงาน การทำงานและการตั้งค่าที่ไม่เหมาะสม ชิ้นส่วนเครื่องจักรกล ชิ้นส่วนไฟฟ้าเสียหาย และสาเหตุอื่นๆ จะทำให้เครื่องไม่ทำงาน อันดับแรกโปรดค้นหาสาเหตุจากตารางต่อไปนี้และดำเนินมาตรการที่มีประสิทธิผล หากปัญหายังไม่สามารถแก้ไขได้ โปรดติดต่อซัพพลายเออร์
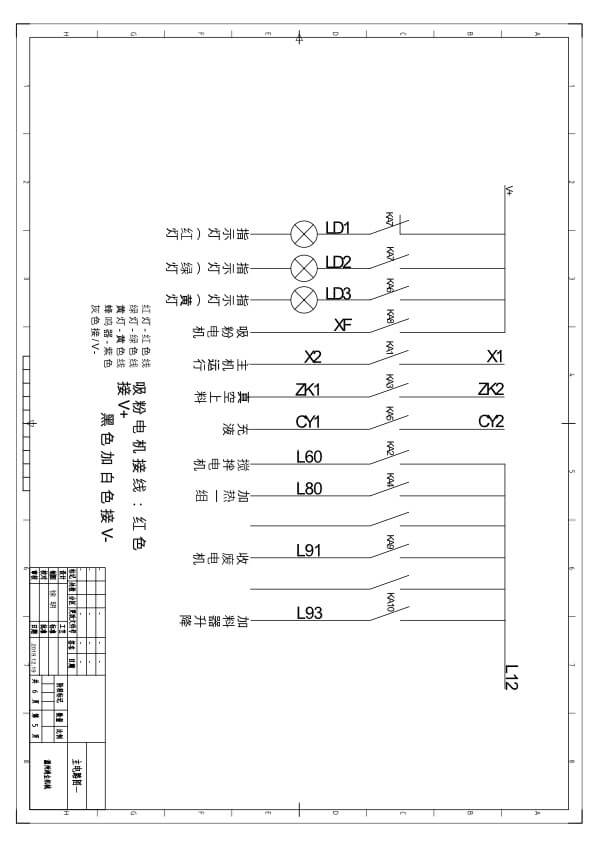
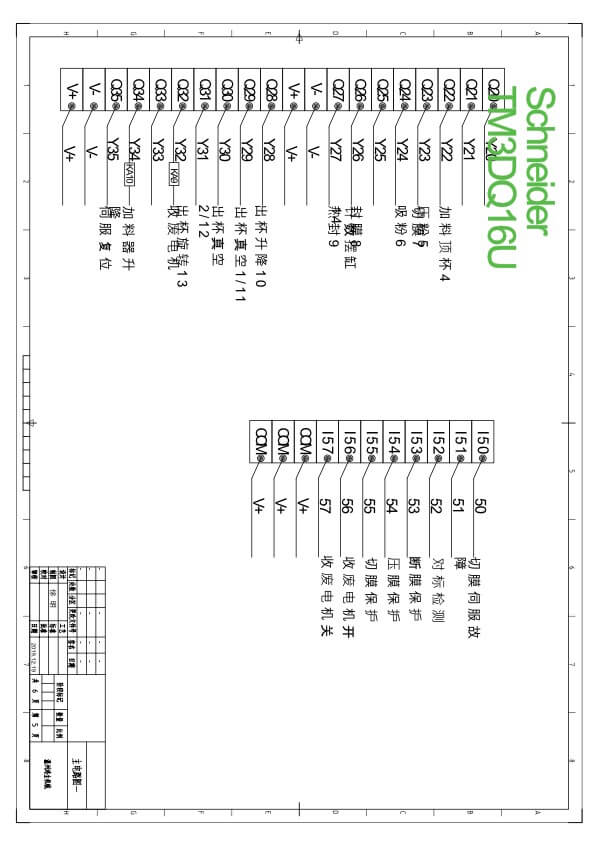
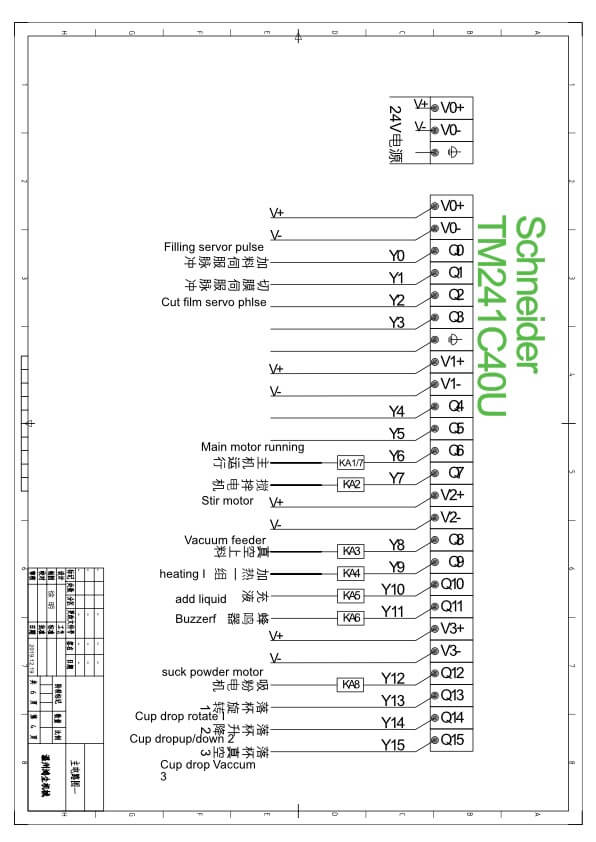
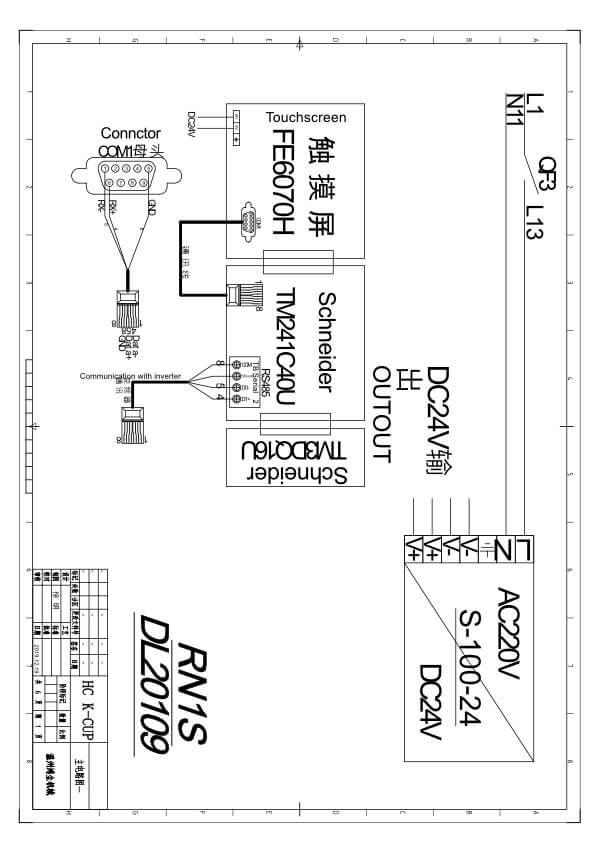
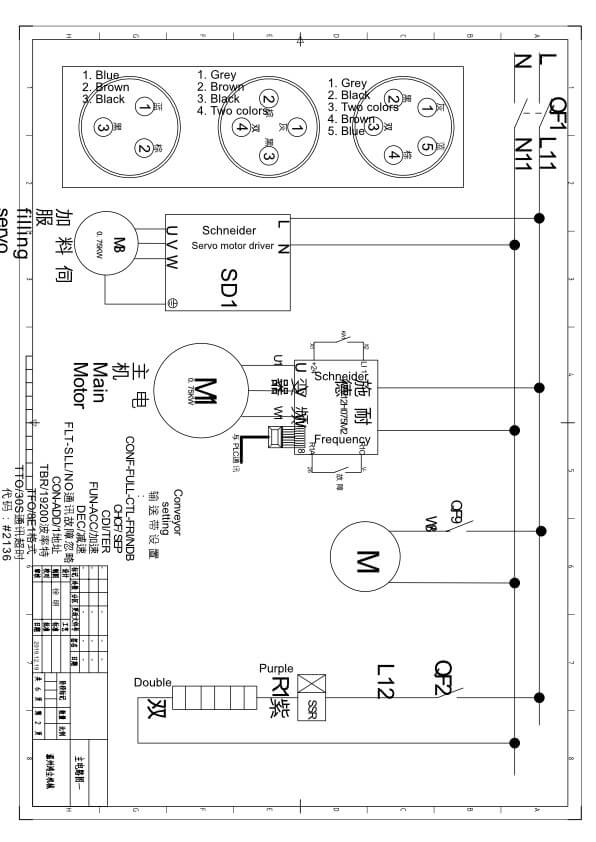
ภาคผนวก B: แผนผังทางไฟฟ้าของเครื่องบรรจุแคปซูลกาแฟ
11 พารามิเตอร์ทางเทคนิคของเครื่องจักร
หมายเหตุ: เครื่องนี้สามารถบรรจุแคปซูลข้อมูลจำเพาะบางอย่างได้เท่านั้น หากคุณเปลี่ยนขนาดแคปซูล จำเป็นต้องเปลี่ยนแผ่นแม่พิมพ์
| คำอธิบาย | พารามิเตอร์ |
| น้ำหนักผงเติมสูงสุด | 8-15ก |
| ความเร็วบรรจุภัณฑ์ | 50-70 แคปซูล/นาที |
| ความแม่นยำในการเติมกาแฟ | ±0.2ก |
| สถานีพักรถ | 1 |
| น้ำหนักสุทธิของเครื่อง | 750กก |
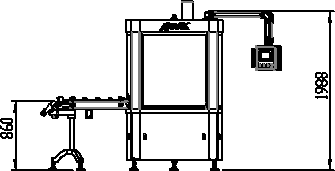
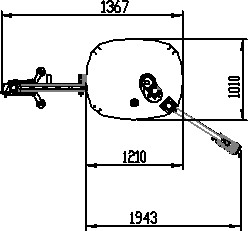
| ขนาดตัวเครื่อง | 1,745 มม. (ยาว) X1150 มม. (กว้าง) X2850 มม. (สูง) |
รูปภาพ 27 - พารามิเตอร์เครื่องจักร
12 ขนาดเครื่อง
