The majority of K-cup filling machine operators don’t consider maintenance until it is forced upon them. Those are the types of problems we can afford to have when they are costing us $4000 per hour in line down time. This guide covers the full maintenance protocol AFPAK engineers use for K-cup filling and sealing machines — daily checklists, auger calibration, sealing head care, FDA documentation requirements, and step-by-step troubleshooting for the six faults our customers report most.
It doesn’t matter if you operate a linear or rotary K-cup filling machine, this schedule and troubleshooting logic are equally relevant.
K-Cup Filler Quick-Reference Specs
| Parameter | Specification |
|---|---|
| Auger fill variance target | ±2% by weight |
| Sealing head temperature range | 100–300°C (adjustable per lid material) |
| Sealing head pressure | 0–0.6 MPa (standard K-cup) |
| Servo speed (K-cup) | 1,500–2,500 RPM |
| Servo speed (Nespresso) | 1,000–1,500 RPM |
| Food-grade lubricant required | Yes — FDA 21 CFR 178.3570 compliant |
| Recommended PM cycle | Daily / Weekly / Monthly / Semi-Annual |
What Poor Maintenance Really Costs: The Production Numbers
Breakdowns in packaging equipment generally don’t give a lot of warning. As per PMMI packaging industry data, 60% of the unplanned downtime for production lines is due to failure of mechanical or electrical (absolutely not a software one) components. In the case of a K-cup filling line those are the auger drive, the sealing head and the cup-detection sensors.
The only way to find those is by performing a systematic inspection and cleaning.
The costs of one actual break down unplanned backup for a medium size coffee company are:
60%
of unplanned stoppages come from mechanical or electrical failures
PMMI 2024
16,000
capsules lost in a 4-hour stoppage at 4,000 caps/hr
Scenario calculation
$4,800+
direct output loss per incident at $0.30/capsule wholesale
Before labor, waste & parts shipping
A mid-scale roaster than makes 4,000 capsules/hr will produce 32,000 K-cups in an 8 hour shift. An unexpected auger failure in hour three will not only lose 6 hours of production time, but set off a required cleaning cycle, an actual fill-weight calibration run and, in most cases, a partial batch discard. That’s at best 4 hours of the output; 16,000 K-cups.
At $0.30 per K-cup wholesale, that’s just one event in direct production output for $4,800.
A regular production schedule (k cup filler) maintenance program – daily cleaning, weekly lubricating, monthly calibrating – normally takes less than 2 hours of k cup filler total down time per month, if a plan is in place. The math is simple.
The K-Cup Filler Maintenance Calendar: Daily, Weekly, Monthly & Semi-Annual Tasks
AFPAK’s 4-Tier Maintenance schedule breaks down machine maintenance into four timeframes. Each time frame has an encompassing set of actions that support the steps before. The daily schedule supports the daily run, and the semi-annual supports the lifespan of the machine.
Below you see our engineer’s recommendation for when each step is performed on machines operating on a single shift- 8 hours a day.
| Daily Tasks | Weekly Tasks | Monthly Tasks | Semi-Annual Tasks |
|---|---|---|---|
| Clean sealing head surfaces (remove coffee oil residue — dry cloth only) | Lubricate cam followers, chain drives, and pivot points (food-grade grease) | Inspect Teflon sealing tape; replace if lid sticking is observed at correct temp | Full bearing inspection; replace any showing pitting or roughness on rotation |
| Wipe optical cup-detection sensors (antistatic lint-free cloth) | Check air tube connections and pneumatic fittings for leaks or loosening | Run fill-weight calibration check — weigh 5-cup sample, log results | Sealing head temperature calibration — verify thermocouple against contact thermometer |
| Clear powder hopper of residual coffee (prevent cross-batch contamination) | Inspect conveyor belt tension and alignment; adjust if belt walks to one side | Clean and inspect cup-lift suction cups; replace if cracked or deformed | Servo motor drive belt tension check; replace if elongation exceeds spec |
| Check auger shaft collar area visually for powder compaction or buildup | Apply food-grade grease to cup-lift mechanism pivot points | Replace sealing die O-ring set (minimum every 3 months; keep 2 sets in stock) | Full internal machine cleaning including powder channels and discharge chutes |
| Log date, technician name, and any abnormalities in the maintenance record | Review PLC fault code log; record and investigate any codes not seen before | Top up food-grade lubricant at all designated lubrication points | FDA documentation audit: verify maintenance log completeness for prior 6 months |
Engineering note: heat sealing head surfaces should be cleaned on each day of operation. Coffee oils that are not cleaned off of the surface on a daily basis will burn on at sealing temperatures of 150-250C causing a very hard coating of coffee oils on the sealing die. In 3-5 production days this buildup will produce die-related inconsistency in lid adhesion, the first manifestation of which will be peel force variation, then it will eventually produce visible seal failures at the cup rim.
A 90-second wiping at the end of every shift will save a 3 hour troubleshooting run. AFPAK’s coffee capsule machine cleaning protocol details chemical specific instructions.
How Often Should You Clean a K-Cup Filling Machine?
Sealing head and sensors – daily. The hopper and auger system should be cleaned thoroughly every week if only one type of coffee is being used, or between the doses during a multi-variety run. The whole interior (channels, cup-lift system, chutes) should be cleaned on a monthly basis.
One common routine maintenance oversight: while operators always wipe down the hopper, they miss the cup-lift components themselves. This has the side effect of causing buildup of both coffee dust and lubricant product, eventually leading to a Drift in cup-positioning accuracy and the same symptoms of “powder outside cup” as a more-crude misalignment of the cup holder.
Maintenance Frequency: Decision Guide
| IF your situation is… | THEN adjust your schedule like this: |
|---|---|
| Machine runs >8 hours/day | Perform daily tasks every shift; move weekly tasks to every 5 days |
| Machine runs <4 hours/day | Weekly tasks can extend to every 10 days; monthly tasks to every 6 weeks |
| Switching coffee varieties mid-run | Run a purge cycle (15–20 min) between batches; wipe hopper and auger before refilling |
| Fill variance exceeds ±3% after recalibration | Stop adjusting parameters. Contact your AFPAK engineer — auger flight wear is likely |
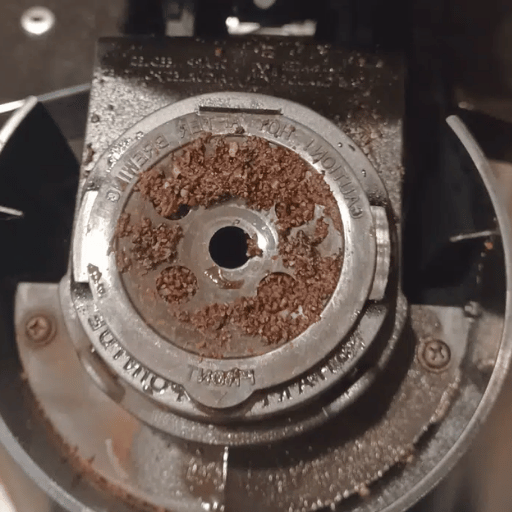
Auger & Powder Delivery System: Maintaining Fill Weight Accuracy
The auger (filling screw) precisely meters out a fixed amount of coffee into each cup every time you cycle the machine. When the auger comes out of calibration, you get either weak/tasteless underfilled cups or overfilled cups crashing into the sealing station, jamming the lid. Maintaining calibration largely involves “keeping an eye on it” rather than frequent adjustments.
The industry accepted volumetric variance for auger fillers, confirmed by use among packaging machine OEMs for similar drive architecture, is 2%. At 10g/cup, this works out to 9.8-10.2g, which a well maintained auger system will measure continuously. If an auger system suddenly fluctuates outside this range, the likely cause is a worn auger flight or buildup on the drive shaft collar by the rapid rotation. See: How to Set Filling Parameters on a K-Cup Filling Machine.
Industry process docs: 2% variance setting (note you can’t set variance yourself on RN1S without base on board), and servo parameters:
| Parameter | K-Cup Range | Nespresso Range | Notes |
|---|---|---|---|
| Servo speed | 1,500–2,500 RPM | 1,000–1,500 RPM | Lower RPM for finer grinds |
| Servo acceleration | 50–300 ms | 50–300 ms | Tune for powder flow behavior |
| Servo deceleration | 50–300 ms | 50–300 ms | Affects dose tail-off; key for accuracy |
| Fill weight variance target | ±2% | ±2% | Industry standard for auger fillers |
For the full parameter setup process, see: How to Set Filling Parameters on a K-Cup Filling Machine. Model-specific references: RN1S fast-changeover manual | H2 model machine manual.
Engineering Alert: If your fill weight drifts over 2% of target even after servo recalibration, stop adjusting servo values immediately. Your auger flight is the suspect. Check its blade tip radius for wear mark progression. Check the area under the shaft collar for buildup that could indicate compaction. Either of these is a Stage 2 wear indicator. Contact your package provider before doing more runs: worn flights accelerate variance as they wear and contribute to dangerous overfills which can stick the sealing head.
Sealing Head Maintenance: Temperature, Pressure & Teflon Replacement
The sealing head hot-presses a foil or film lid onto each cup. It is by far the most temperature-sensitive subsystem onboard, and the one you—as operators—are most likely to make an incorrect change on.
Standard operating parameters for K-cup sealing:
| Parameter | Operating Range | Typical K-Cup Setting |
|---|---|---|
| Sealing temperature | 100–300°C | 150–220°C (varies by lid supplier spec) |
| Sealing pressure | 0–0.8 MPa | 0.3–0.6 MPa |
| Dwell time (contact duration) | 0.3–1.5 seconds | 0.5–0.8 seconds |
| PP rim softening threshold | >280°C | Do not exceed — irreversible rim deformation |
Caution: Never run more than 280C on standard PP K-cup lids. Once the lid goes translucent; rim softening is an irreversible deformation of the lid itself that renders it unable to seat against the cup holder squarely. This voids the cup manufacturer’s warranty. In the cases where operators are raising the temperature to fix leaky seals, what actually happens most of the time is a Sealing head misalignment or lid foil contamination. Always double-check the machine alignment setting before you start altering the temperature.
Teflon head liner wear is monitored condition-based, not time-based. Under full-capacity use (8 hr/day), you should see replacement about every 3-6 weeks. The visual cue indicating Teflon wear: lidding begins to paste itself to the head surface even at the correct temperature setting. Make sure to replace the liner as soon as you notice adhesion; a jammed (stuck) seal at the midpoint of a run can require a full head disassembly to clear, costing far more than a proactive Teflon swap. Check temperature calibration (comparing the thermocouple reading with an IMC handheld contact temperature probe) about every 6-12 months.
Pro Tip: Run a full 5-capsule seal integrity test every time you re-assemble the sealing head or change temperatures. Pull-tab peel force of your foil K-cup lids should be in the 15-25 N range on a calibrated pull-force gauge. Less than 15 N indicates a weak seal. Over 25 N indicates the lid film is too heavily over-bonded and tearing at peel. This 2-minute test allows you to counteract calibration drift before it hits your packaged product.
For a detailed explanation of seal failure modes and the cost to each batch: Why Your Coffee Capsule Seals May Be Failing – and What it’s Actually Costing.
Troubleshooting K-Cup Filler Problems: 6 Issues & Root-Cause Fixes
When your K-cup filling equipment behaves “off,” most operators pick up the phone and call their supplier. While not always necessary, that’s not as often the solution as you might think – most faults fall into one of six categories and can be diagnosed and fixed by the operator if they understand the underpinnings.
| Issue | Root Cause | Immediate Fix | Prevention |
|---|---|---|---|
| Powder spreading outside cups | Cup holder misalignment or static electricity buildup in hopper | Check cup registration; verify antistatic grounding cable; reduce servo speed 10% and test | Daily sensor and grounding check; see powder spreading guide |
| Inconsistent fill weight (>±2%) | Auger flight wear, hopper level drop, or coffee density change between batches | Weigh 10 consecutive cups. Random variance = auger wear. Directional drift = hopper level or density. Recalibrate servo, then re-weigh. | Monthly fill-weight calibration log; inspect auger flights every 6 months |
| Lids peeling or leaking after sealing | Sealing head misalignment, wrong temperature for lid material, or contaminated foil surface | Check sealing head alignment before touching temperature. Confirm lid spec matches sealing program. Clean die surface. | Pull-tab force test after every head reassembly; weekly die inspection |
| Machine stops mid-run (sensor fault) | Optical cup-detection sensor blocked by coffee dust accumulation | Power down, wipe all sensors with antistatic lint-free cloth, restart. Fault clears immediately in most cases. | Add sensor wipe to daily end-of-shift routine — takes 2 minutes |
| Grinding or clattering noise during operation | Loose auger shaft collar or dry bearing (lubricant depleted) | Stop the machine immediately. Identify noise source. Tighten shaft collar if loose. Apply food-grade grease to bearing. Never run a dry bearing. | Weekly lubrication of all bearing points; monthly shaft torque check |
| Sealing head sticking to lids | Teflon coating degraded, or sealing temperature above lid material spec | Lower temperature 10°C and test. If sticking continues, Teflon is spent — replace coating. Do not increase pressure to compensate. | Inspect Teflon condition monthly; replace at first sticking sign |
Unbelievably common: static electricity is the least diagnosed problem we encounter in K-cup filling. Operators see coffee on the outside of the cup and automatically assume a positioning problem. But if the grounding cable is loose or the anti-static brush is worn, fine ground coffee will spray out all over the walls of the cup no matter how precise the setup. Checking the grounding connection takes all of 30 seconds, and is the whole diagnostic.
— Jeffree Fang, Owner & Lead Engineer, AFPAK
Why Is My K-Cup Filling Machine Spreading Coffee Powder?
Feathering of fill around the rim of the cup is the most-popular question asked of AFPAK engineers on support requests. Cause for 80% of cases: misaligned cups (cup holder off-center beneath the auger nozzle). Cause for 15% of cases: static charge in the hopper (fine-grind coffee grabs on the cup sides and spills out over time). Cause for 5% of cases: servo speed too high for grind size (finer espresso grinds simply can’t tolerate high RPM because they’re so light and dense. Coarser grinds can stay at high RPM but finer cannot).
The diagnostic process: run 5 cups at half speed and watch the entry point at fill. Is the fill centered? If so, static is likely – check the grounding cable. Is the fill not centered, and is spread happening at full production speed? Dial back servo acceleration 20 percent and run the final test again. AFPAK’s full powder spreading troubleshooting guide details the full parameter management walk-through.
What Causes Inconsistent Fill Weight in K-Cup Machines?
Causes of a variance over 2% relative to target weight are invariably one of three different root causes: auger flight wear (more erratic and random than an intended error, with no two consecutively weighed cups ever weighing the same amount); hopper content below the minimum fill level (random directional drift as constantly decreasing); or shipped coffee being significantly more dense or light than the previous delivery (balance drift between two unique roast profiles or moisture levels butargoon level remains consistent).Weigh10 consecutive cups before changing any execution parameter.
FDA & Food Safety Compliance: What Your K-Cup Maintenance Log Must Include
This is what most if not all K-cup manufacturers have no clue about being required to implement. Under the FSMA Preventive Controls for Human Food regulation of the Food and Drug Administration(21 CFR Part 117), all food producers whether they fill 500 or 500,000 capsules per day are required to keep written documentation about the maintenance, cleaning and calibration of their equipment.
While auditing against the SQF Packaging Manufacturing Code, SQF auditors are looking for the following items in the logs – once again, failure to find any of these is an audit finding:
FDA Maintenance Documentation Checklist for K-Cup Producers
- Date and time of each maintenance activity (not only date, time also matter because of traceability)
- Name of the technician performing the work, plus signature or initials verifying completion
- Ingredients (replace Food-contact parts by Lot No, if applicable).
- Lubricant name+brand, product name, EU number, and exactly where to apply on the machine.
- Fill-weight calibration; target weight-actual 5-cup sample avg-pass/fail
- Name of cleaning agent used (i.e. chemical designation or trade name) and verification that washing in rinse cycle was performed
- Any defects or abnormalities observed during the maintenance activity
- Action to be carried out for each defect (,) and checked that it was sucy-.
FDA regulations have approval standards for lubricants, found in 21CFR 178.3570—”Lubricants allowed in food processing plants.” You maintenance log must document the precise lubricant used–e.g. NSF H1 approved food-grade grease, ISO VG 68—not just “lubricant applied.” NSF H1 approval ensures the lubricant complies with 21CFR 178.3570 and incidental contact with food. The general FDA preventative controls regulations are detailed in the HACCP Principles and Application Guidelines.
All competitor equipment pages in this section do not provide the checklist for FDA maintenance records requirement. Including this checklist in your SOP now will make you audit ready and a step ahead of having to reconstruct your historical files.
Spare Parts to Stock On-Site: Minimize Downtime Before It Starts
Most preventable reason for K-cup machine downtime: waiting to receive shipped replacement part. AFPAK suggested splitting your on-site spare parts inventory into two categories: 1) Critical Stock (items that put the machine to a halt should they break; should be available before they are needed); 2) Good-to-Have (order; 2-5 days shipping time).
| 🔴 Critical Stock — Keep In Inventory at All Times | 🟡 Good-to-Have — Order Before Next Scheduled Maintenance |
|---|---|
| Teflon sealing tape / sealing die coating — consumed every 3–6 weeks at full production; never let this reach zero | Backup heating element — model-specific; confirm part number with AFPAK before ordering |
| Sealing die O-ring set — replace every 3 months minimum; keep 2 full sets in stock | Auger drive belt — 1 spare; service life 6–12 months depending on run hours and tension |
| NSF H1 food-grade lubricant, ISO VG 68 (21 CFR 178.3570 compliant) — top up on schedule; don’t run to empty | Cup-lift mechanism suction cups — set of 4; replace when cracking or deformation is visible |
| Optical sensor cleaning cloths — antistatic, lint-free; box of 100 covers a full quarter | Spare servo motor brush set — check motor spec sheet for brush-type compatibility |
| Filling nozzle gaskets — 2 sets minimum; these degrade with repeated heat cycles and are a frequent source of fill weight drift | Pneumatic quick-connect fitting assortment (matching your machine’s air line spec) |
All Critical Stock items have a singular attribute each—a broken part means a broken machine, which is non-repeatable until the shelf. Purchase Teflon tape, O-ring sets and food-grade lubricant at the time you open the last one—don’t wait until you’ve finished your last one. For AFPAK-specific part numbers and model lists and MOQ’s, contact AFPAK directly.
Stocked parts will ship within 2 business days from our warehouse.
K-Cup Filler Maintenance in 2025–2026: What Predictive Systems Are Changing
Predictive maintenance—real-time sensor data used to prevent failures—has evolved from emerging technology to best practice for packaging equipment. According to the industry data from PMMI for 2024, 71% of new packaging machinery now ships as standard with predictive maintenance integrated. The worldwide packaging equipment predictive maintenance market was $1.2 billion in 2024, expanding at 19.2% each year.
This means that for K-cup filler machine operators, this change has three immediate consequences:
PLC fault logging is in itself already predictive data. The latest generation AFPAK machines have a PLC it’s a touch screen which records (With a time date stamp) every fault code that occurs while the machine is running. Operators currently tend to only read the fault log when the machine stops, However by simply looking at the fault log a weekly summary may point to common failures this may show as sensor failure it occurring every Tuesday at six o’clock this could then be looked at as a gap of cleaning caused perhaps by dust settling.
The data is already there we just need to look at it regularly.
Fill-weight trending detects auger wear before failure. By maintaining monthly fill-weight calibration logs and trending them you put together a self-funded predictive maintenance program. Fill weight trending from 1.2% over-density/weight to 1.7% over-d/ weight to 2.1% over-d/weight over three months can tell you not only when to rebuild a wind-park contributing machine but also avoid the catastrophic consequences of a mid-production wheel and/or auger siezure.
For older machines, retrofit sensor kits are available. Vibration sensors, temperature probes, and batch-weight loggers can be installed on most K-cup fillers that are 3 or more years in age. If you purchase a somewhat older machine, ask your manufacturer about retrofit possibilities before you invest in an entire new piece of equipment – sensor investments are usually 10-15% of a new machine.
Pro Tip: begin a predictive program with no budget at all — use a spreadsheet of your monthly fill-weight test results, sensor fault codes by date, and Teflon replacement dates. In 6 months you’ll have a more accurate prediction of your machine’s failure than anyone’s generic maintenance schedule.
For how machine design affects long-term maintenance requirements, see: Linear vs Rotary K-Cup Filling Machine — Which Suits Your Production? and How to Evaluate Coffee Capsule Machine Performance.
FAQ: K-Cup Filling Machine Maintenance
How often should I descale a K-cup filling machine?
K-cup filling machines cannot descale in the same sense as consumer Keurig brewers, because there isn’t a water reservoir or heating element that interacts with the liquid flowing through the beverage path. You’re simply trying to clean coffee oil and deposits off the filling and sealing parts; the only closely associated clean-in-place cycle is daily hopper cleaning, and weekly system wipe-down. This is a consumer brewer/coffee maker concept and not something related to filling equipment in industry.
What type of lubricant is safe for coffee capsule filling equipment?
Only NSF H1 certified food-grade lubricants are acceptable. NSF H1 certification confirms the lubricant meets FDA 21 CFR 178.3570 requirements for incidental food contact. ISO VG 68 grade viscosity is suitable for use in virtually all cam, chain & bearing points on K-cup fillers.
Do not use automotive or industrial grade lubricants – these will contain corrosion inhibitor additives unacceptable in a food environment and will leave an FDA gap in your maintenance record.
How long does a K-cup filling machine last with proper maintenance?
A properly operated and maintained K-cup filler running one shift (8 hours/day) usually reaches 8-12 years of service life before a serious mechanical overhaul. For two shifts/day, this drops to 5-8 years. The two most life-limiting components are the auger drive assembly and the sealing head heating element—both are user-replaceable, without retirement of the entire machine.
If you are purchasing or upgrading to equipment with recorded maintenance histories, the resale value is significantly higher.
Can I clean the sealing head with water?
The sealing head has electrical heating elements and a thermocouple in it. Water introduced to these components risks short-circuit damage and accelerates corrosion of the element housing. Wipe the sealing die surface clean using a dry lint free cloth only.
If there is hardened carbonized build up a small amount of food-safe dry cleaning solvent can be used -(examine the machine manual or ask your supplier for the approved cleaning agent before putting this chemical anywhere near the sealing head).
What happens if I run a K-cup filler without cleaning the hopper?
Three progressively worsens. 1) Where old coffee from a previous batch remains in equipment it contaminates the current batch-a food safety and customer quality issue. 2) Coffee oil left in the hopper walls stales, goes rancid and taints the fresh product with negative off-flavours. 3) Above 2% fill-weight variance, due to powder accumulated in the hopper neck, with sticky clumped old coffee clogging the area. Clean hopper between coffee types and every shift end as a minimum.
How do I eliminate static electricity in my K-cup filling machine?
There are 3 easy troubleshooting steps to eliminate static in your coffee powder hoppers. 1. Make sure the machine’s earth grounding cable is attached to a good building ground (wet metal pipe is ideal). The first thing you should always check for static is the grounding cable. 2.
Check the antistatic brush for the auger shaft and replace when bristles are less than 5 mm long. 3. Place a passive ionizer bar before the hopper if the static persists after the ground is established correctly. During ‘dry’ seasons in the facility (less than 40% relative humidity) static will be worse.
When should I contact the manufacturer instead of troubleshooting myself?
If the fill weight variance is over 3% and there is no change after servo recalibration – contact AFPAK or your machine supplier (probably wear on the auger that demands parts) if the sealing head temperature is greater than5C from your set point (may need to change the thermocouple), if the PLC displays a fault code not in your operator manual or if any grinding noise doesn’t clear after lubrication – do not run a bearing that sounds wrong. AFPAK engineers can be reached through WhatsApp to diagnose your machine in real time during your operating day.
Questions about your K-cup filling machine maintenance setup?
AFPAK engineers offer free 15-minute maintenance consultations — by WhatsApp, email, or Zoom — for current customers and buyers evaluating maintenance requirements before purchase.
Related Guides from AFPAK
- K-Cup Filling Machine Buying Guide — What to Evaluate Before You Purchase
- How to Set Filling Parameters on a K-Cup Filling Machine
- Why Your Coffee Capsule Seals May Be Failing — and What It’s Costing You
- Rotary K-Cup Filling Machine Buying Guide
References & Sources
- U.S. Food and Drug Administration. FSMA Preventive Controls for Human Food – 21 CFR Part 117. ecfr.gov
- U.S. Food & Drug Administration. Food-Grade Lubricants — 21 CFR 178.3570. ecfr.gov
- U.S. Food and Drug Administration. HACCP Principles and Application Guidelines. fda.gov
- Safe Quality Food Institute. SQF Code 13: For the Manufacture of Food Packaging. sqfi.com
- PMMI. The Association for Packaging and Processing Technologies. Packaging Machinery Benchmarks 2024. pmmi.org
This document was authored by AFPAK’s own engineering department from extensive first-hand experience designing, manufacturing, and supporting K-cup filling and sealing machines. The technical information, maintenance schedules, and troubleshooting sections are all based on AFPAK machine specifications. All sources used to reference industry-standard information are linked to above.
The information used to reference FDA and FSMA requirements are based on primary U.S. government sources and should be verified with your nation’s applicable compliance counsel.
Jeffree Fang
Owner and Lead Engineer- AFPAK.
More than 15 years directly designing and manufacturing K-cup, Nespresso, and Dolce Gusto Series1 filling and sealing equipment. Jeffree-Carter is the technical support team lead for AFPAK and responds to many complex troubleshooting situations with individual customers in more than 40 countries worldwide. His documentation on coffee capsule machinery is used to produce roast-and-ground coffee by small-batch roasters and enterprise-level contract packers.