Alle kantoormanagers zijn bekend met: Een enkele persoon in een kantoor keert terug om te ontdekken dat de laatste portie koffie is gezet, de Keurig is uit het water, en voor de ne×t acht minuten de machine zit gewoon op kantoor te wachten tot iemand anders het reservoir vullen Neem dat, met een 40-persoons kantoor met 60 kopjes per dag, en je hebt een geheel onverwacht gebruik van de tijd.
Een zelfvullende Keurig lost dit volledig op Of het nu via een fabrieksmodel of een doe-het-zelf-vlotterklepretrofit is, uw Keurig-koffiezetapparaat met een permanente waterleiding betekent dat het waterreservoir automatisch wordt gerefilleerd met nul-naar-terug-brouwen wordt de norm, en niemand hoeft opnieuw op de machine te passen Deze gids behandelt elke optie: speciaal gebouwde loodgietersmodellen, waterleidingkitinstallaties, doe-het-zelf-autofill-opstellingen en de commerciële implementatiewiskunde die de upgrade de moeite waard maakt Het behandelt ook wat de meeste installatiegidsen mis hebben, en de enige stap die mislukking veroorzaakt als ze worden overgeslagen. Voor de context van het bredere single-serve koffie-ecosysteem, ons single-ecosysteem, ons single-s. K-cup sealmachine gids behandelt hoe de peulen zelf worden vervaardigd.
⚡ Zelfvullende Keurig 'Snelle specificaties'
| Waterleiding druk vereist | 40-125 PSI (aanbevolen: 60-80 PSI) |
| Buisgrootte (standaard) | 1/4″ OD (compressiefitting) |
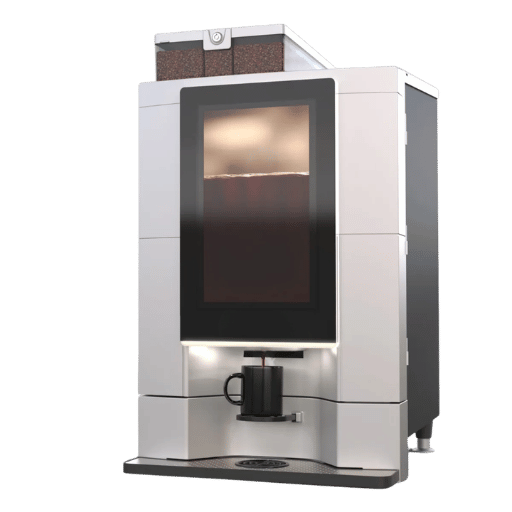
| Speciaal gebouwde loodgietersmodellen | K-2500, K-155, K-3500, K-4500 |
| DIY kit kostenbereik | $25-$75 (alleen materialen) |
| Commercieel model prijsklasse | $549-$3.400 |
| Beste use case | Kantoor of commerciële setting brouwen ≥25 kopjes/dag |
Wat is een zelfvullende Keurig? (Hoe het automatische opvulsysteem werkt)
Een zelfvullende Keurig is elke Keurig-machine die is geconfigureerd om automatisch water uit een permanente waterbron te halen. 'Een loodgieterswaterlijn' 'In plaats van dat er handmatige reservoirvullingen nodig zijn. Het vult zich op aanvraag na het brouwen na, zonder tussenkomst.
Twee verschillende paden leiden naar een zelfvullende opstelling. Pad één is een speciaal gebouwd loodgietersmodel: commerciële Keurig-brouwers (K-2500, K-155, K-3500, K-4500) die worden geleverd met een speciale inlaatpoort voor de waterleiding en rechtstreeks kunnen worden aangesloten op een watervoorziening van het gebouw via een koperen of plastic lijn van 1/4″ OD. Pad twee is een doe-het-zelf-retrofit: het uitrusten van een standaard Keurig-reservoir voor consumenten met een vlotterklepsamenstel en een kleine toevoerleiding zodat het waterreservoir automatisch wordt bijgevuld, waardoor automatisch bijvullen binnen een budget mogelijk is.
Beide benaderingen gaan uit van hetzelfde natuurkundige principe: leidingdruk duwt water in het reservoir via een vlotterklep of interne sensor totdat het doelniveau is bereikt, voor commerciële modellen met directe leidingen moet de bedrijfsdruk tussen 40 en 125 PSI dalen, waarbij 60-80 PSI de praktische sweet spot is Lijnen die boven 80 PSI lopen, vereisen een drukreduceerventiel vóór de machineaansluiting.
Alle drie de namen “keurig waterlijn,” “pl,” en “direct waterlijn keurig” beschrijven hetzelfde concept Wat een commercieel speciaal gebouwd onderdeel scheidt van een doe-het-zelf-retrofit komt neer op drie factoren: betrouwbaarheid, garantiestatus en kosten vooraf. Elk wordt hieronder behandeld.
Welke Keurig-modellen sluiten rechtstreeks aan op een waterlijn?
Niet elke Keurig ondersteunt een permanente waterlijn Consumentenmodellen Pl-Mini, K-Supreme, K-Duo en Slim 'Reservoir-only'-ontwerpen zonder waterlijnpoort. Modellen zitten uitsluitend in de commerciële en kantoorreeks van Keurig.
| Model | Water Line | Cup Sizes | Reservoir | Best For | Prijs (ca) |
|---|---|---|---|---|---|
| Keurig K-2500™ | ✅ Kit vereist | 4-12 oz (5 maten) | 110 oz | Klein kantoor, 15-25 personen | ~$299-$399 |
| Keurig K-155 OfficePRO | ✅ Kit vereist | 4-12 oz (5 maten) | 90 oz | Klein kantoor, budgetbewust | ~$199-$249 |
| Keurig K-3500™ (vervangt K-3550) | ✅ Inheemse haven | 6-12 oz | Grote capaciteit | Middelgroot kantoor, 25-100+ personen | ~$549-$649 |
| Keurig K-4500 Café System | ✅ Inheemse haven | Meerdere + café dranken | Café-grade | Grote onderneming, foodservice, café | ~$3,400 |
Opmerking over K-3550: De K-3550 komt in veel oudere gidsen voor en is nog steeds doorzoekbaar op Amazon Keurig heeft het stopgezet; de K-3500 is zijn directe vervanging door vergelijkbare specificaties en prijzen Als u K-3550-vermeldingen ziet, verifieer dan of het nieuwe eenheden zijn en geen gerenoveerde voorraad.
Kan elke Keurig worden aangesloten op een waterlijn?
Nee, alleen de hierboven genoemde commerciële modellen ondersteunen native een permanente waterleidingverbinding. Consumer Keurig-modellen (K-Mini, K-Supreme, K-Duo, K-Slim, K-Select) hebben geen inlaatpoort voor de waterleiding en zijn exclusief ontworpen voor handmatig vullen van reservoirs.
Dat gezegd hebbende, kan elke Keurig met een verwijderbaar reservoir technisch achteraf worden uitgerust met een doe-het-zelf-vlotterklepsysteem. Een kleine leiding voert automatisch water naar het open reservoir. Hierdoor blijft het reservoirvulmechanisme behouden en wordt het automatisch. De vangst: deze aanpak vervalt de garantie en brengt installatierisico's met zich mee (meer daarover in de volgende sectie). De K-2500 en K-155 bezetten een middenweg, ze worden geleverd met een reservoir, maar bevatten een ingebouwde inlaatpoort die is ontworpen voor een waterleidingkit, waardoor ze het schoonste upgradepad zijn voor bestaande kantooropstellingen.
Loodgieterswerk Keurig versus doe-het-zelf automatisch vullen: welke installatie moet u kiezen?
Kiezen tussen opties is niet alleen maar over welke beter is. 'Het gaat erom wat bij uw specifieke volume, locatie en budget past. Hier is de eerlijke vergelijking:
✔ Doelgebouwd sanitair (K-2500, K-155, K-3500, K-4500)
- In de fabriek ontworpen waterlijnpoort 'n boring vereist
- Garantie blijft geldig met goedgekeurde kit
- Professionele installatie verschijning
- Back-to-back brouwen op commerciële volumes
- NSF/ANSI/CAN 372 gecertificeerde watercontactcomponenten
⚠ Beperkingen
- $549-$3.400 machinekosten
- Beperkt tot specifieke commerciële modellen
- Vereist toegankelijke watervoorziening van gebouwen
✔ DIY Float Valve Retrofit
- ~$25-$75 materialen kosten
- Werkt op de meeste Keurig reservoir modellen
- Geen nieuwe machine aankoop nodig
- Omkeerbaar (reservoir kan opnieuw worden geïnstalleerd)
⚠ Beperkingen
- Voids fabrikant garantie
- Risico op reservoirboringen (zie hieronder)
- Vereist 40-125 PSI-leidingdrukcontrole
- Niet levensvatbaar bij hoge commerciële volumes
🔧 De zelfvultest met 3 vragen
Beantwoord deze drie vragen op volgorde Je antwoord bepaalt de juiste opstelling.
Q1: Brouwt u meer dan 25 kopjes per dag op deze locatie?
Ja: U hebt een speciaal gebouwd commercieel loodgietersmodel nodig (K-3500 of K-4500) DIY retrofit kan het volume niet betrouwbaar aan.
Nee: DIY vlotterklep kit of K-2500/K-155 met reservoir kit zijn beide haalbare opties.
Q2: Is dit voor een kantoor of commerciële omgeving met toegankelijke sanitair?
Ja: Keurig K-3500 (middelgroot kantoor) of K-4500 (onderneming/caf) Budget voor professionele installatie.
Nee: doe-het-zelf kit of K-2500 met optionele waterlijn kit dekt thuis of weinig verkeer scenario's.
Q3: Is uw budget voor de brouwer boven $500?
Ja: Koop een speciaal gebouwd loodgietersmodel Garantiebescherming, professionele uitstraling, betrouwbaarheid op lange termijn.
Nee: DIY vlotterklep kit (~$25-$75) is de meest kosteneffectieve pad als u comfortabel bent met de basisinstallatie.
Hoe een zelfvullende Keurig in te stellen: Water Line Kit versus doe-het-zelf (stap voor stap)
Welke maat waterlijn gebruikt een Keurig?
Alle Keurig commerciële loodgietersmodellen gebruiken een 1/4″ OD (buitendiameter) compressiefitting bij de waterinlaat van de machine Dit is een standaardformaat in de commerciële wereld van koffieapparatuur, dezelfde fitting die wordt gebruikt door de meeste commerciële espressomachines en waterfilters onder de toonbank. U kunt een plastic (polyethyleen) buis van 1/4″ OD of een koperen buis van 1/4″ OD gebruiken. Kunststof is gemakkelijker rond kasten te leiden; koper is duurzamer voor permanente installaties Vermijd scherpe bochten in plastic buizen, gebruik een buisbender of leid om obstakels heen om de stroomsnelheid te behouden.
📐 Technische opmerking: De commerciële waterleidinginlaten van Keurig gebruiken 1/4″ OD-compressiefittingen Vereiste lijndruk: 40-125 PSI (aanbevolen werkbereik: 60-80 PSI) Niet rechtstreeks aansluiten op commerciële hogedrukwaterleidingen van meer dan 80 PSI zonder dat stroomopwaarts een drukreduceerventiel (PRV) is geïnstalleerd Zadelklepkranen mogen in koper of ijzeren buis worden geboord, en nooit in PEX of CPVC zonder dat daarvoor geschikte T-fittings zijn ontworpen.
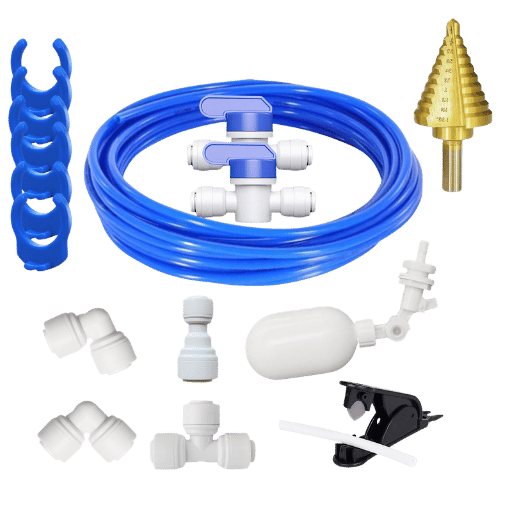
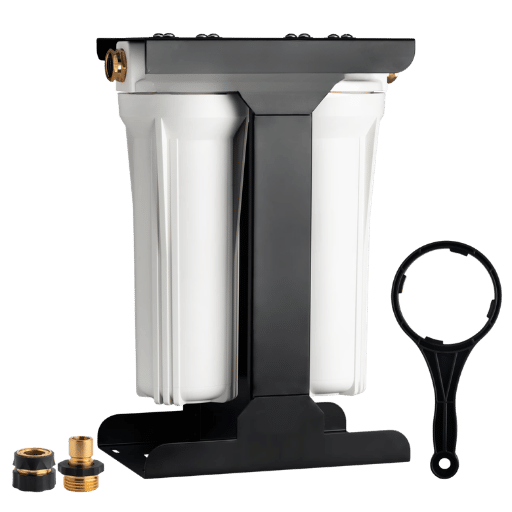
Methode A: Officiële Keurig Water Line Kit (K-2500 / K-155 modellen)
- Verzamel materialen: Keurig-goedgekeurde waterleiding kit (inclusief 1/4″ OD buizen, compressie fittingen, en zadel klep), Omnipure KQ8A in-line filter (verplicht voor K-2500 garantie), verstelbare sleutel, boor (voor zadel klep).
- Spoel het filter eerst: Voordat u iets aansluit, laat u 30-60 seconden water door het Omnipure KQ8A-filter in een emmer lopen. Bij niet-gespoelde koolstofmedia komen fijne deeltjes vrij die de interne inlaatklep van de brouwer verstoppen. Dit is de oorzaak van het falen van het brouwen na de installatie.
- Installeer de zadelklep: Sluit het water af bij een nabijgelegen afsluitklep; dit is vaak onder de gootsteen Klem de zadelklep vast aan de koperen buis Draai de klembouten gelijkmatig vast (ga gemakkelijk aan de bout vastdraaien, vooral op geel, ouder koper); boor door het doorsteekpunt van de zadelklep om een gat in de buis te slaan;
- Verbind 1/4″ Lijn: Installeer buizen vanaf de inlaat van de inline filtermachine van de zadelklep. Bevestig ze aan de muur/kast met behulp van plastic clips die niet strakker zijn dan 2″ (buigradius).
- Controledruk: Water opnieuw aansluiten Pas een inline drukmeter voor de inlaat van de machine en bevestig de aflezing tussen 40-125 PSI. Als er meer dan 80 PSI op een drukreduceerventiel past.
- Verbinden met machine-inlaat: Duw de 1/4″-buis in de compressiefitting aan de achterkant van de K-2500. Draai alleen met de hand - zorg ervoor dat de compressiefitting niet overmatig wordt geactiveerd.
- Installeer de magneet van de reservoirsensor: Veel geleiders slaan deze belangrijke stap over De magneet van de reservoirvlottersensor moet worden geïnstalleerd tijdens directe lijnwerking, normaal gesproken vastgeklikt op het oppervlak van de vulpoort. Als de magneet niet is geïnstalleerd, zal het waterniveaumetectiecircuit van de machine een signaal geven aan “ Het zal niet starten met het vullen met de waterlijn liveConsulteer uw modelinstallatiegids voor magneetplaatsingdit is de #1 reden waarom Keurig niet zal vullen na het aansluiten van de waterlijn.”.“
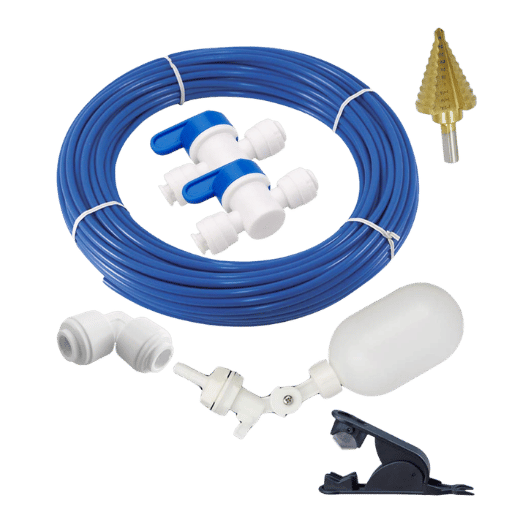
Methode B: DIY Float Valve Retrofit (bestaande consument Keurig)
- Benodigde artikelen: 1/4″ OD polyethyleen buis (6-10 ft), inline vlotterklep (standaard toiletvulklep met 1/4″ weerhaakfitting), zadelklep, 3/4″ schopboor, rubberen doorvoertule (3/4″).
- Identificeer het boorpunt: Plaats het lege reservoir op een stabiel oppervlak en markeer de locatie van het vulgat op de buitenwand van het reservoir (meestal ongeveer 1-2 inch vanaf de bovenkant, helemaal vrij van eventuele interne schotten).Centrale pons eerst en vervolgens boor.
- Boor langzaam: Met behulp van een schopbeitelboor het mark out-gat bij laag toerental (350-500).Breng weinig maar constante neerwaartse druk aan. Wees niet in de verleiding om je te haasten! De neiging van het getrapte bit om op gebogen plastic te lopen is de enige oorzaak van gestraalde reservoirs.
- Steek doorvoertule en vlotterklep: Plaats de rubberen doorvoertule in het geboorde gat en duw vervolgens de weerhaakfitting van de vlotterklep erdoorheen. Draai de meegeleverde moer vast en draai deze met de hand vast. U kunt deze ook te strak vastdraaien en de reservoirwand scheuren.
- Aansluit toevoerleiding 1/4″ OD-slang van zadelklepkraan naar vlotterklepinlaat De toevoerleiding niet hoger brengen dan nodig is om vuldruk toe te staan.
- Lektest: Draai de watertoevoer heel langzaam aan Observeer de vulcyclus van de vlotterklep Stel de vlotterarm zo in dat het reservoir zich op het normale bedrijfsniveau kan vullen en sluit zonder aarzeling.Controleer alle fittingen op lekken.
Loodgieters Keurig voor kantoor- en zakelijk gebruik: implementatiegids
📊 Kantoorkoffiemarkt Belangrijkste nummers
- De wereldwijde markt voor Office Coffee Service (OCS) bedraagt in 2025 $6,8 miljard en zal in 2034 $11,4 miljard bereiken met een CAGR van 5,9%
- Onder de meest relevante factoren van personeelsbeloningen zoals gegeven door HR-beslissers, noemt 71 procent een goede koffiekwaliteit.
- Commerciële CPC voor “commerciële keurig met waterlijn”: $6-9- Geeft extreem hoge commerciële kopersintentie aan
- Gemiddelde tijd tot ROR op KEURIGS (directe loodgietersaanvulling aan de drankzijde van de werking) versus Barista-service: 2-6 weken
Voor kantoorkopers valt deze beslissing uiteen in drie niveaus, gebaseerd op het dagelijkse brouwvolume en de organisatiegrootte.
Niveau 1 Klein kantoor (5-2 personen, 15-40 kopjes/dag): Ga met de K-2500 of K-155 gepaard met een waterleiding kit Machine: $199-$399. Kit: $30-$60 Totale setup onder $500 Met een 1,450W verwarmingselement en vijf cupmaten (4-12 oz), de K-2500 handvat ochtendspits zonder een toegewijde operator Met een loodgietersverbinding blijft de temperatuur consistent en verdwijnt het reservoirbeheer.
Niveau 2 Groot kantoor (25.100 personen, 40.120 kopjes/dag): Toegewijd aan dit segment, de K-3500 (voorheen K-3550) schepen een native waterlijn poort 'geen kit vereist Hoogvolume brouwcapaciteit handvat back-to-back vraag zonder thermische terugwinning vertraging Huidige prijsklasse: $549-$649.
Tier 3 Enterprise / Food Service (100+ personen of café omgeving): Op ondernemingsniveau voegt het K-4500 Café System ($3,400) speciale dranken (lattes, cappuccino's via melkopschuimer) en schalen toe aan de volumes van de foodservice. Op dit prijspunt verschuift de vergelijking van barista-arbeidskosten naar volledige foodservice-infrastructuur. Veel ondernemingen in dit boek onderzoeken ook de productie van kopjes op maat. Zie het onderstaande gedeelte over de productie van K-cup.
| Scenario | Setup Kosten | Maandelijks operationeel | Alternatieve kosten | Maandelijkse besparingen |
|---|---|---|---|---|
| K-2500, 20 personen, 30 kopjes/dag | $399 + $60-kit | $495/mo (pods) | $700/mo (bezorgservice) | $205/mo |
| K-3500, 60 personen, 40 kopjes/dag | $649 | $660/mo (pods + geamortiseerde machine) | $1.200/mo (baristaservice) | $540/mo |
A productielijn koffiecapsules is noodzakelijk voor bedrijven die geïnteresseerd zijn in het aanvullen van hun marketing met op maat gelabelde peulen die hun eigen braadstuk of huismix bevatten: “Custom K-cups” bevinden zich aan de commerciële volume-kant van het spectrum Voor bekende koffiemerken die hun eigen Keurig-programma al op de markt brengen”K-Cup verpakkingen voor kleine koffiemerken” beschrijft de productieroute met het laagste volume.
Waterkwaliteit en filtratie voor loodgieterssystemen
In elke loodrechte Keurig is de smaak scheef of wordt de machine ingekort vanwege de waterkwaliteit. Dit is de belangrijkste bijdrager aan het machineleven en de koffiesmaak.
✅ Checklist voor het instellen van de waterkwaliteit van Plumbed Keurig
- Test de waterhardheid in eerste instantie Doel voor: <7 GPG Als het leidingwater groter is dan 7 GPG, is een in-line filter niet optioneel, het is essentieel.
- Gebruik een NSF goedgekeurd in-line Carbon filter zoals de Omnipure KQ8A voor K-2500 Dit zal chloor verminderen, sediment en off-smaken verlaten Verander elke 3-6 maanden.Filterwater dat door dit systeem gaat beschermt smaak en het leven van de machine.
- Ontkalkingsschema: 0-4 GPG-water elke 6 maanden. 4-7 GPG elke 3-4 maanden. Meer dan 7 GPG elke 2 maanden en niet minder; en indien nodig een polyfosfaatvoorbehandelingspatroon aanschaffen.
- Omgekeerde osmose alleen indien nodig: Het gebruik van gefilterd water uit een standaard koolstofblokfilter is voldoende voor de meeste gemeentelijke voorzieningen. Een volledig RO-systeem is alleen gerechtvaardigd in gebieden met zeer hard water (>10 GPG) of waar TDS hoger is dan 180 ppm. Volledige RO is niet vereist voor typische kantoorimplementaties.
- Controleer TDS door filter: Koffie moet worden gebrouwen bij ongeveer 75-150ppm TDS met enkele porties Als de TDS te laag is, zal de koffie smaak missen (pure RO onder 50ppm) en als deze te hoog is, zal de schaal zich te snel opbouwen (meer dan 200ppm).
Hoe de K-Cups in uw Keurig daadwerkelijk worden gemaakt (commerciële productie uitgelegd)
Alle K-cups beginnen als een schone PC-geperste beker met mesh filter A K-cup vulmachine doseert een vast gewicht van voorgemalen koffie (normaal gesproken 9-12 gram, min of meer, per kopje), brengt het foliedeksel aan en sluit de bovenkant af in dezelfde cyclus. Het starten van K-cup-vulapparatuur zorgt voor een output van 50-70 K-cups per minuut met een kapitaalinvestering van $30.000. Roterende en meerbaans K-cup-vullers verhogen de outputcapaciteit tot 120-200 kopjes per minuut voor operators met een hoger volume.
Commerciële schaal economie bevoordeelt in-house productie Inzicht in de K-cup productiekosten per kopje $0.08-$0.18 bij binnenkomst commerciële volumes vs. $0.40-$0.80 voor merk retail pods 'legt uit waarom groeiende koffiemerken investeren in productieapparatuur in plaats van groothandel te kopen Bedrijven die commerciële Keurig-programma's uitvoeren, kunnen aangepaste pods inzetten met hun eigen gebraden profiel, waardoor de afhankelijkheid van Keurig's gelicentieerde capsulecatalogus volledig wordt verminderd.
📊 K-Cup-markt 2025-2020 Momentopname
- Wereldwijde K-cup /single-serve capsulemarkt: $9,58 miljard (2025) $12,84 miljard in 2030, 6.03% CAGR
- De productie van private label K-cup kan worden ingeschakeld bij een redelijk instapniveau (bedrijven kunnen gemakkelijk 50.000 kopjes per maand maken)
- Lege K-cups en deksels zijn verkrijgbaar als afzonderlijke componenten voor bedrijven die hun eigen pods vullen
- Voor een volledige technische analyse: verpakkingsproces voor koffiecapsules legt de stappen voor vullen, afdekken en QC uit.
Zelfvullende Keurig en de toekomst van commerciële koffie (wat verandert er in 2025-2026)
Verschillende belangrijke trends convergeren rond de adoptie van loodgieterswerk Keurig De groei op de Office Coffee Service-markt ($6.8B in 2025, die zich uitbreidt op 5.9% CAGR tot en met 2034) wordt voornamelijk aangedreven door de uitbreiding van de terugkeer naar kantoor in Noord-Amerika en APAC. Single-serve, no-barista-vereiste systemen veroveren het aandeel binnen deze groei 'ze elimineren de arbeidskosten terwijl ze de perceptie onder werknemers behouden.
De laatste tijd, aan de consument en prosumer einde van het spectrum, Google trend data voor zoekopdrachten van “reusable k cup” en “reusable keurig pods” heeft +22113T YoY toename snelste groei meten trefwoorden tijdens onze onderzoeksperiode De inferentie: part eigenaren van Keurig systemen beginnen kosten te verlagen en werken aan duurzamere systemen, niet kopen een hoop meer van hen Bedrijven met een nationale of regionale loodgieters Keurig willen misschien beginnen met het aanbieden van hun eigen herbruikbare K-cup programma naast de standaard K-cups.
Keurig Dr Pepper heeft shopbuildingcapsules met Wi-Fi-ondersteuning, logistieke en trayniveau-telemetrie gelanceerd die gebruikstrends, filtervervanging en voorspellende foutwaarschuwingen mogelijk maken die rechtstreeks terug naar de locatiemanager worden gegenereerd. Voor kantoorbeheerders met tientallen Keurigs in het hele land elimineren op afstand beheerde koffiemachines vrijwel de fase van het inchecken van iemands machines.
In het spelletje van de fabrikanten van speciale koffie, namelijk springen in de bandwagon met één serve, wordt het argument om de pods in eigen huis te maken alleen maar beter. Beste K-cup vulmachine voor kleine bedrijven opties beginnen nu onder $20.000, en de roterende K-cup vulmachine formaat verlaagt de kosten per kopje tot onder de $0.12 op schaal $0.12 ruim binnen bereik voor speciale koffiemerken die concurreren op podprijs Cap-vulapparatuur als markt zal naar verwachting groeien van $2,85 miljard (2025) naar $4,92 miljard in 2035 bij 5,6% CAGR, wat een bredere acceptatie van één enkele dienst wereldwijd weerspiegelt.
Veelgestelde vragen
Kan ik mijn bestaande Keurig omzetten naar zelfvullen? ▼
Ja 1300000000000000000000000000000000000000000000000000000000000000000000000000000000000000000000000000000 automatiseren uw Keurig heeft een verwijderbaar waterreservoir, kan de navulprocessautomatiseren Houd er rekening mee dat deze aanpak de fabrieksgarantie ongeldig maakt Voor een garantie op garantie, commerciële Keurig modellen (K-2500, K-155, K-3500) schip met de fabriek ontworpen waterleidingpoorten en ondersteunde installatiekits.
Welk Keurig-model sluit rechtstreeks aan op een waterlijn? ▼
Vier commerciële modellen ondersteunen de waterlijnverbinding: K-2500™ (klein kantoor, $299-$399, kit vereist), K-155 OfficePRO (budgetkantoor, $199-$249, kit vereist), K-3500™ (middelgroot kantoor, $549-$649, inheemse haven; vervangt stopgezette K-3550), en K-4500 Café System (~1TPini, K-Supreme, K-K-400, onderneming/voedselservice, inheemse haven) Consumenten Keurig-modellen K-Supreme, K-Duo-lijnverbinding zijn standaard water- en niet-waterverbinding.
Hoeveel kost een commerciële loodgieters Keurig? ▼
Sys-tem-kosten variëren van $199 (K-155) tot $3.400 (K-4500 Café System) Voeg indien nodig $30-60 toe voor een waterleidingkit (K-2500, K-155). Professionele loodgietersinstallatie, indien nodig, is over het algemeen $150-300 voor een lokale loodgieter om een 1/4″ lijn te laten lopen vanaf de dichtstbijzijnde watervoorziening.
Totale projectkosten voor een klein kantoor is $350-600. voor medium kantoor K-3500 $649-950 geïnstalleerd. K-4500 bedrijfsimplementaties: $3,600-$4,000 geïnstalleerd.
Heb ik een waterfilter nodig voor mijn loodgieters Keurig? ▼
Ja ist K-2500 moet geoptimaliseerd worden met een NSF in-line koolstoffilter (Omnipure KQ8A of vergelijkbaar) om garantie op water gerelateerde onderdelen te kunnen blijven Voor de rest zou een filter aan te raden zijn met 4 GPG of meer hard water of water met een duidelijke chloorgeur In het meeste gemeentelijke water zal het gewoon een koolstofblokfilter gebruiken ($20-$40).
Volledige omgekeerde osmose mag alleen worden gebruikt in gebieden met zeer hard water (>10 GPG) of waar de TDS hoger is dan 180 ppm.
Hoeveel kopjes per uur kan een commerciële loodgieters Keurig brouwen? ▼
K-3500 maakt bijna hetzelfde als de K-2500 of ruwweg 35-40 kopjes per uur bij normaal gebruik (1,5-minuten zetcyclus 60 minuten, minder thermisch herstel) Het K-4500 Café Systeem is gespecificeerd voor een commercieel “ met hogere frequentie” gebruik met snellere thermische hersteltijd, en in “ maakt elke dag” gebruik 45-55 kopjes per uur Om dit in perspectief te plaatsen ondersteunt een K-2500 met zijn 1.450W verwarmingselement 20-30 kopjes per uur in een cyclus totdat thermisch herstel het dubbele van de tijd begint te nemen.
Dus als je meer dan 60 kopjes per uur wilt, heb je meer dan één eenheid nodig, of moet je naar een commercieel druppelsysteem kijken in plaats van naar een keurig.
Zal het aansluiten op een waterlijn mijn Keurig-garantie ongeldig maken? ▼
Het hangt er echt vanaf. Het aansluiten van een commerciële Keurig (K-2500 / K-155 / K-3500 /4500) met behulp van een door Keurig goedgekeurde waterlijnkit maakt de garantie niet ongeldig. Dit is een officieel ondersteunde configuratie, zoals ze zeggen op TV Het gebruik van het juiste inline filter (Omnipure KQ8A voor de K-2500) is een garantievereiste; hierdoor vervalt de garantie niet als u het zelf doet.
Als u een doe-het-zelf-vlotterklepmod (het reservoir uitboren met behulp van een hardwarefitting van derden) op een consumentenkeurig uitvoert, vervalt uw garantie voor watergerelateerde problemen.
📚 Gerelateerde lezing van AFPAK
Beoordeeld door het AFPAK Engineering Team. AFPAK is gespecialiseerd in commerciële K-cup vul - en sluitapparatuur voor koffiemerken wereldwijd Technische specificaties in dit artikel zijn afkomstig uit Keurig commerciële installatiedocumentatie, NSF-certificeringsrecords, en publiek beschikbaar marktonderzoek Waar gegevens geschat of illustratief zijn, wordt dienovereenkomstig genoteerd.